
All users of Windows are familiar with the live tiles that display necessary information without opening the app. This feature was introduced way back on Windows 8. There are specific tiles for displaying information related to news, weather, etc. These tiles can be rearranged, resized and moved as per your need. These tiles access live information in real time from social networks, messaging systems, internet, etc.
A live tile usually has information flashing on it. There are issues with the tile such as a blank tile or a static tile. A static tile is one which displays the name of the program on its icon while a blank tile does not display anything.
Also read: How to Fix-Windows 10 Background Disappears?
How to Fix Windows 10 Live Tiles Not Working
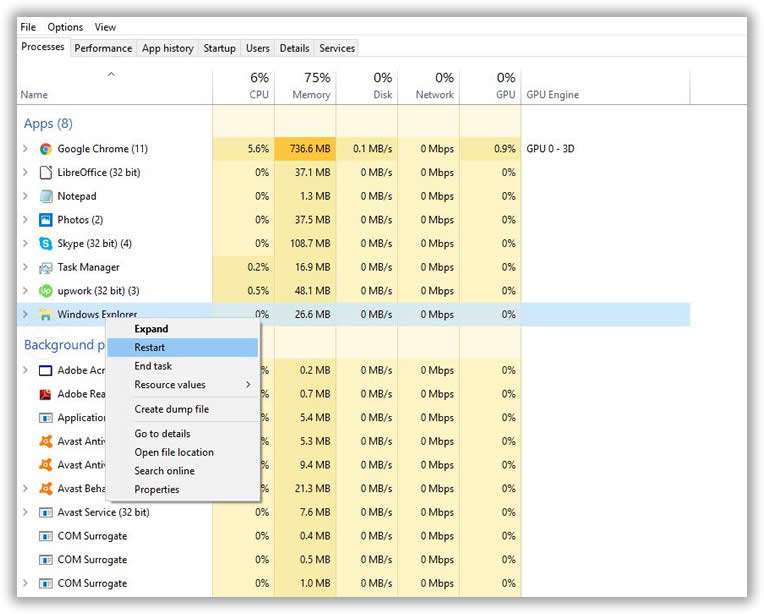
Step 1: Restart explorer.exe. For this right click on task bar > Task Manager. Go to Process tab, search Windows Explorer. Right click on it. Restart your system.
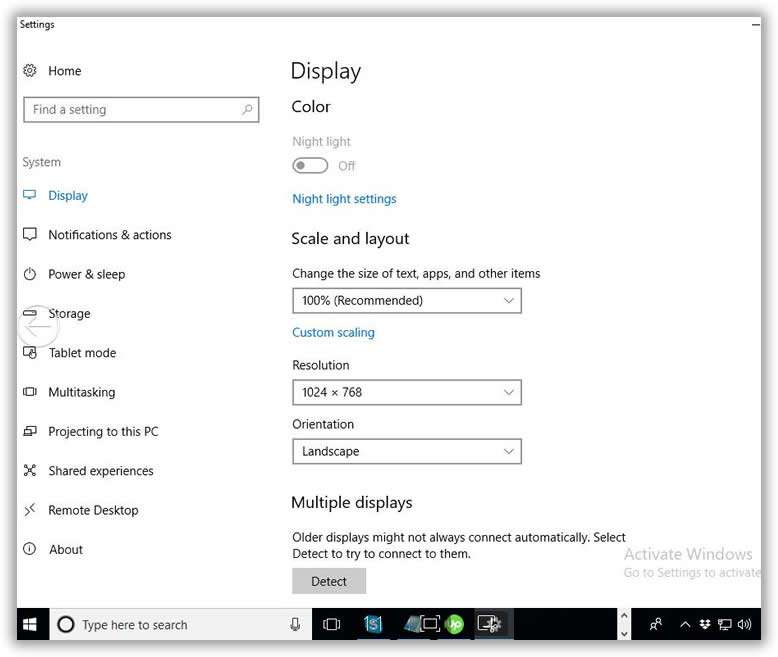
Step 2: Make sure that you have a screen with a resolution of 1024×768 and turn on your User Account Control.
Step 3: After this, you will need to Run the Windows App Troubleshooter.
Step 4: Go to Settings and Reset Windows 10 Apps.

Step 5: Live tiles use .jpg or .png file format. Installation of any conflicting software could result in a problem with the working of the tiles. Therefore, it is a good idea to check if the problem started after the installation of any new software. If such is the case, you could try uninstalling the software and check.
Step 6: Interchanging the local and Microsoft accounts could help resolve the issue.
Step 7: You could try unpinning and pinning the App tile to the start screen.
Step 8: With the help of the Uninstaller, you can try to uninstall and reinstall or repair the App or software.
Step 9: Next the System File Checker should be Run.
Step 10: Use the “Refresh PC” feature to refresh your computer.
However, one of the best ways to resolve the problem of tiles not updating, Windows 10 can be made to automatically flush live tiles every time the system is shut down. This ensures that live tiles update themselves every time the system is switched on. If your Windows 10 Live Titles not working, just follow the steps above to fix.
Tip: How to Flush live tiles in Windows 10
Windows Registry can be used to automatically flush live tiles when you shut down your system. However, prior to editing, Registry should be backed up.
You can flush live tiles by following the procedure mentioned below:
- In the Start Menu, locate regedit.
- Right click on Start and Select “Run as Administrator”.
- This opens the Windows Registry Editor with admin privileges.
- Navigate to
- HKEY_CURRENT_USERSOFTWAREPoliciesMicrosoftWindows
- This leads you to the target key.
- On reaching thew target key, create a new key to activate automatic tile flushing.
- For creating the New key, right click on Windows, Select option New and then Key.
- Give the New Key the name Explorer and Press Enter
- Right Click on the right panel to Select the New Key.
- Select “New->D WORD(32 bit) Value”
- DWORD Value is created. Name this value “ClearTilesonExit”.
- After this, the default data value needs to be changed.
- Double Click on the newly created value.
- Go to Edit Value Window
- Enter 1 in value Data field
- Save changes by clicking on Ok.
- Restart your system to validate the changes. After this Windows will automatically flush tiles when your system is shut down and tiles will be updated on turning it on.
In Conclusion
Among the many incredible features that Windows 10 offers its users, Tiles is a popular one. Any issues with the functioning of this feature can end up frustrating the user. There are simple DIY methods to troubleshoot and correct the problems of static or blank tiles. However, if your problems do not get resolved, it is recommended that you consult a professional.
Related Articles:


