Login screen/lock screen is a standard feature which is available on all mobile and desktop operating systems. For security reasons, it is essential to leave it enabled. But, Some users may want to disable it as they think it may save their time. This article aims to provide relevant information and instructions to disable login screen in Windows 10.
Before going to turn off this feature, you should know about the security threats. Login screen in Windows 10 ensures that your device is safe from third-persons. If you disable login/lock screen, anyone can access to your PC in your absence. However, If anyone can easily get access to your PC physically, it will be much easier for him/her to check your emails, personal data, etc. Sometimes, It can be extremely dangerous. Only a single security vulnerability can bring endless suffering. So, Think twice if you still want to do it.
There are more than one methods to skip login screen or stop it from being visible to you. Now, Let's go through these processes.
Part 1: Disable Password Option
This process applies to everyone who uses Windows 10 especially the users who have connected their PC to their Microsoft account and don't want to use a local account instead. You can have your MS account remain connected even after disabling the login screen. To do it, you will need to follow these instructions.
Step 1. First of all, Open RUN. If you don't know how to do it, Just press Win + R on your keyboard. It will launch RUN.
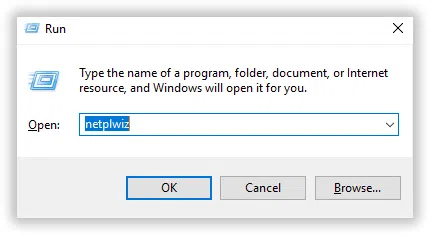
Step 2. Then, Type "netplwiz" and click OK or hit enter on the keyboard. This command will open users account window.
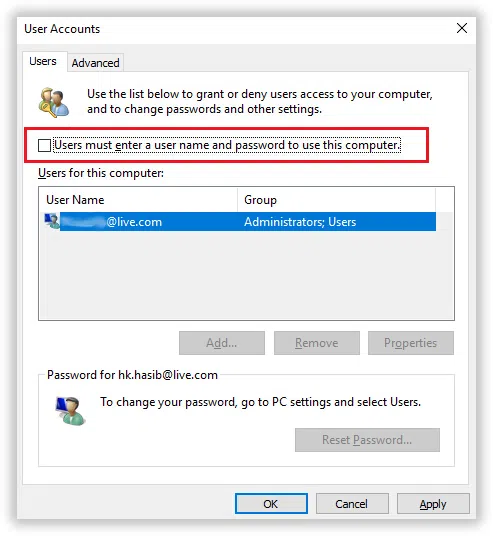
Step 3. In the new window, you should see an option "Users must enter a user name and password to use this computer." Just uncheck it and click OK. It will prompt a new window.

Step 4. Now, You will need to provide proper credentials and click OK. Then, Restart your computer.
You are done. From now, You won't have to bother with the login screen. You will see no lock screen too. Your PC will automatically be logged in.
If you're locekd out of your Windows 10 and can't sigin it, maybe you need to reset Windows 10 password.
Method 2: Disable Lock Screen Using Local Account without Password
This one is another method that can help you to disable login screen in windows 10. But, It is a bit longer. Method 1 is more straightforward than 2. But, Some users may want to know additional ways to do the same thing. This process is for them. This method is divided into two steps. You can disable or skip login screen by following these steps.
Step 1. Migrate to a Local Account. Migrating to a local account from a Microsoft account in Windows 10 is very simple. If you are using the latest Windows 10 build usually known as the fall creators update version, this step will disable the login screen. But, There are two conditions. First one is "You can't set any password to your local account," and another one is "You should have the only one single user account." However, Here are the instructions you will need to follow:
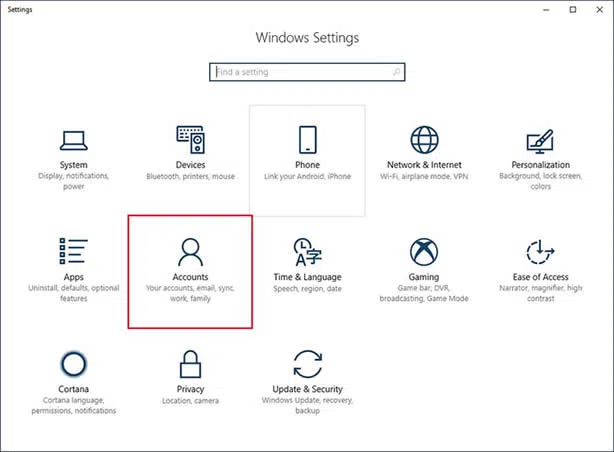
Step 2. At first, Press Win + I on keyboard. It will open settings window.
Step 3. Now, Go to "Settings" > Accounts from the start menu.
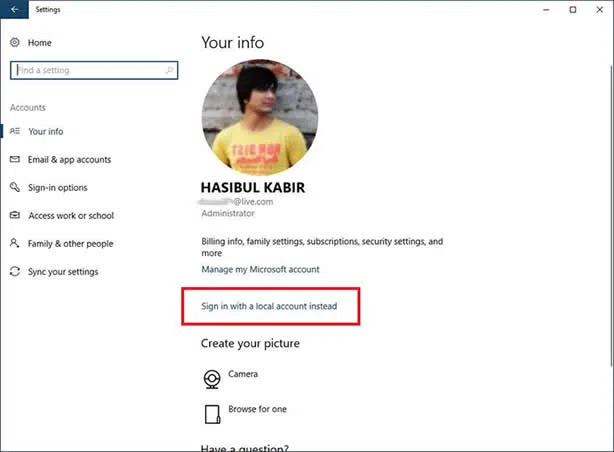
Step 4. Then, You will find the option "Sign in with a local account instead" Just click on it.
Step 5. Now, It will ask you for your MS account password to verify that it's you. Just, Finish the verification.
Step 6. Then, Provide the local user account details. You will only provide the username. Password field should be empty.
Step 7. After providing everything, it will sign out from your Microsoft account and create a local administrator account.
Step 8. From now, you will not see any login screen if you restart or turn on your PC.
However, In some cases, You will still have to see the login screen. So, follow step 2 to complete the whole things correctly.
Also read: How to bypass Windows 10 password without knowing password
Method 3: Disable Lock Screen on Windows 10 via Local Group Policy Editor
When your PC awakes from sleep mode, you may still see the login screen. Else, In some windows builds, step 1 won't disable it. So, You will have to turn off the lock screen which will also disable login screen. Here are the instructions:
Step 1. First of all, Open RUN like before.
Step 2. Then, Type gpedit.msc and press enter. It will open windows group policy editor.
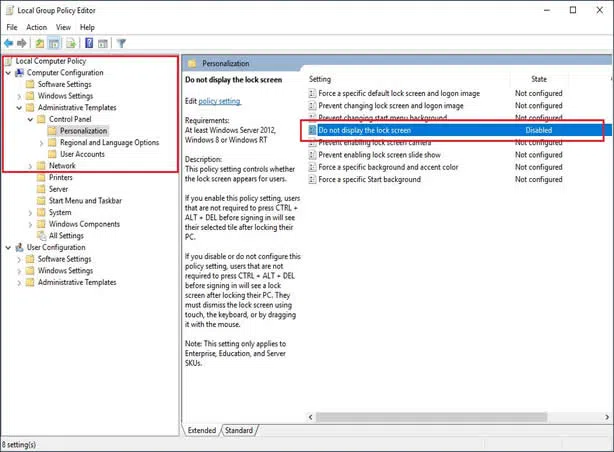
Step 3. Now, Go to Computer Configuration > Administrative Templates > Control Panel > Personalization.

Step 4. Then, Doubleclick on "Do not display the lock screen."
Step 5. Now, Check Enabled and click OK. Restart your PC.
From now, you won't have to face lock screen or login screen in windows 10 anymore. Though disabling login screen has some security concerns, it is still useful to some users. Above methods are working on all builds of Windows 10 till now. There are some other methods you may find online which are not working on latest builds anymore. So, I hope you will find this article helpful.