
If you are a frequent user of computers, then securing your perimeter is of utmost importance that is the files and folders and all essential information from being misused. There is a probability that someone can trespass and mess up with your system settings, which can prove to be catastrophic at times. It can cause huge loss and problems for you. Thus if you can set up a means through which restrictions are put to the system access, that can save you the trouble of losing your important documents and files.
Here in this article we would discuss about how to add one such security measures, that is password protection to your system with operating system Windows 10.
Continue reading to know as to how to add the password to local user account in Windows 10.
Method #1: Adding Password to Local User Account Using System Settings
The windows is well equipped with many features to protect the system from outer intrusion, here we would employ the system password settings to add the password protection feature to your local user account.
Step 1. Go to the “Start” button and click on it.
Step 2. Type in “Settings” in the search box, and hit “Enter”.
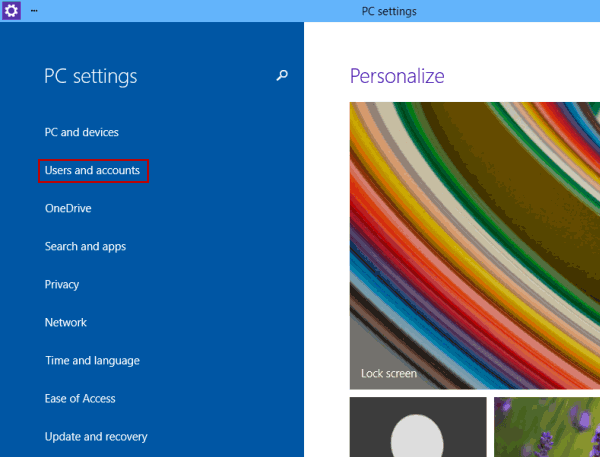
Step 3. From the list of options that turn up, click on “PC Settings”.
Step 4. Under the list of menu for “PC settings” click on “Users & Accounts”.
Step 5. Once you have done with this, you will be asked to choose from another 3 options. Click on “Sign-in options”.

Step 6. On the following page, click on “Add” under the Heading Password.
NOTE: From this current panel, you can also set “Picture Password” for your convenience if you are not okay with the usual characters password.
Step 7. After clicking on “Create Password” option, the “Create Password” panel would appear.
Step 8. In the first field box, type in the password you want to set for your local user account. In the second field, type in the same password again for confirmation, and in the third field box, input password hint, and then click “Next”.

TIP: In this method, “Password Hint” is a mandatory and required field.
There you go, your password protection feature is enabled for the local user account, so the next time you start your computer you will be prompted to enter the password you had set here to gain the access securely.
Also read:
Method #2: Add Password to Local User Account Using Computer Management
Here in this section we would use computer management feature which is a collection of admin tools with the help of which you can actually manage to control remote or local computers. Simply follow the steps below accurately to pull off your task.
Step 1.Press ‘Windows key + R” together on your keyboard.
Step 2.The “Run” search box would appear at the bottom left corner of your windows.
Step 3.In the search box, type in the following code: compmgmt.msc and hit “Enter”.
Step 4.On launching the following code, your “Computer Management” window would pop up.
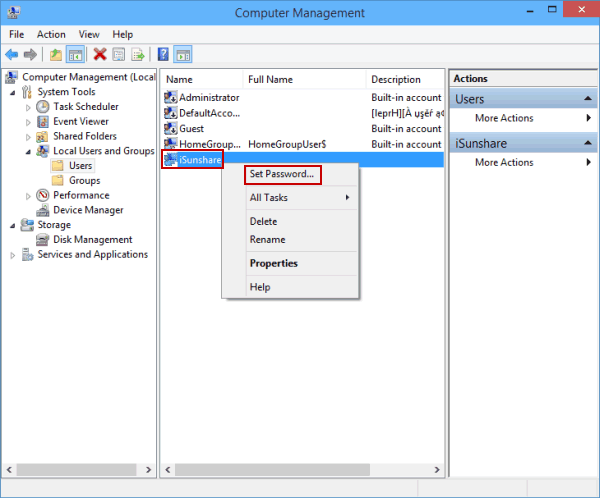
Step 5.On the left side bar of the windows, select “System tools”.
Step 6.From the drop down menu, click on “Local Users & Groups”.
Step 7.Now, click on “Users” from the list of options.
Step 8.Once you are done with this, you will be shown all the local user accounts set in your PC.
Step 9.Right-click on the user account you want to set the password for, and select “Set Password”.
Step 10.Next; you have to click”Proceed” to continue with the process.
Step 11.Now; on the following dialog box, input or your “New Password” and then “Confirm password” and then press “OK”
Step 12.After all these, a dialog box would appear displaying “Local Users & Groups”, click “ok” to finish the process.

WARNING: If you use press ok after creating the new password, your local user account will lose access to all the stored passwords, personal security certificates and encrypted files. Thus make sure you have made a backup of your all those files to a safer location.
Method #3: Creating Local User Account using Control Panel
Control panel is the required location in an operating system to manage and coordinate all the system settings. Here we would use control panel to create the password for the local user account. Read the steps below to know in detail:
Step 1.First open “Control Panel” in Windows 10.
Step 2.On the panel, click on the link “Change account type” under the section “User Accounts & Family Safety”.

Step 3.On the next page that follows, select the user account for which you want to create the password.
Step 4.Click on the “Create a password” link.
Step 5.In the new window, input your password and then retype the password for confirmation. Type-in the password hint, in case you forget the password later on and click on “Create password” button.
NOTE: The password hint here is not a mandatory field, so you can skip it if you wish. If you forgot your Windows 10 password, then try Windows Password Recovery tool to bypass your Windows password lock.
Conclusion:
Creating password for local user account is very much required if you really want to secure your encrypted files, and documents from being exploited. Setting a password protection on your system would not allow anyone unknown to access your computer as he/she would not have the password to sneak-in.
But many a times, creating local user account password creates the trouble of losing all your important files and stored passwords, personal security certificates, thus before starting with the procedure you must be prepared for all the consequences.
Related Articles:


