
Before you proceed ahead with knowing what an ISO burner tool does, it would be better to know first what exactly an ISO file is. ISO file is actually an archive file format abbreviated from (International Organization of Standardization). It usually comes with an extension of .iso. Most of the softwares and operating system are transformed into ISO images which are nothing but an amalgamation of innumerable files compressed and transformed into an image file called ISO image file.
Now the next question might arise, that how to transfer these files to a disk such as CD/DVD, or USB in order to make a bootable disk? Well, if you are a beginner, then you must be thinking about copy the ISO file and paste in the disk. Surely it would transfer the ISO file to the disk, but the file won’t become executable or readable. In order to make it executable or readable you have to burn the ISO image file to the disk. By burning, a separate partition will be created within the disk and all the files will be laid out in an executable format.
Thus for the purpose of burning the ISO image files, there comes the need of an application called free ISO burner, few of which are described below in this article in full length.
Don’t miss: How to burn a ISO file to USB
#1. RMPrepUSB:
RMPrepUSB is an amazing tool which easily and efficiently access the ISO image files and burn them in your specific disk to make a bootable disk out of it. The most distinguishing feature of this article is that it does need to be installed once stored in the hard drive. The steps to use the tool are mentioned below as follows:
Step 1. Once the tool is downloaded on your computer, locate it in your hard drive, and double-click on it and it will start running without any actual need for installation. So there will be no need for registry entries.
Step 2. Insert your USB drive to your computer and RMPrepUSB will detect the device from the port it is connected to.
Step 3. Choose the drive from the tab labeled as “Device” and you can clearly see the device name and the amount of space available on the disk currently.
Step 4. It would be better if you don’t bring any change in three of these fields- Partition Scheme and Target Scheme type; Cluster size; and File System. Leave the “Bootloader” section untouched as a default setting.
Step 5. Click on “Prepare Drive” at the bottom left corner of the screen. This will burn the ISO image file into the disk.
CONS:
- It is time consuming as the burning process may take a lot of time.
- It is an outdated version so might not be compatible with all versions of operating system.
- Quite complicated and not recommend!
Also read: How to make bootable USB flash from ISO on Windows
#2. iSeePassword WizBurn Tool
iSeePassword WizBurn is an exceptionally wonderful tool because it not only burns ISO image files into a disk to make it bootable, it accomplishes the task pretty quickly. It gives way to basically three core functionalities to avoid any errors from coming while the burning process continues.
Important features of WizBurn Tool:
- It creates bootable disk from USB, DVD, CD on Windows XP/ Vista/ 7/ 8/ 10.
- No technical skills are required with this tool. No network services are needed.
- Two partition style supported: MBR(legacy BIOS/CMS boot) and GPT (UEFI boot)
- It can create bootable disk with FAT, Fat 32, NTFS file system.
- All time customer care services are available.
Step 1. Directly download the program file from its official website, and install it accurately with all terms and conditions. Launch it with all admin privileges.
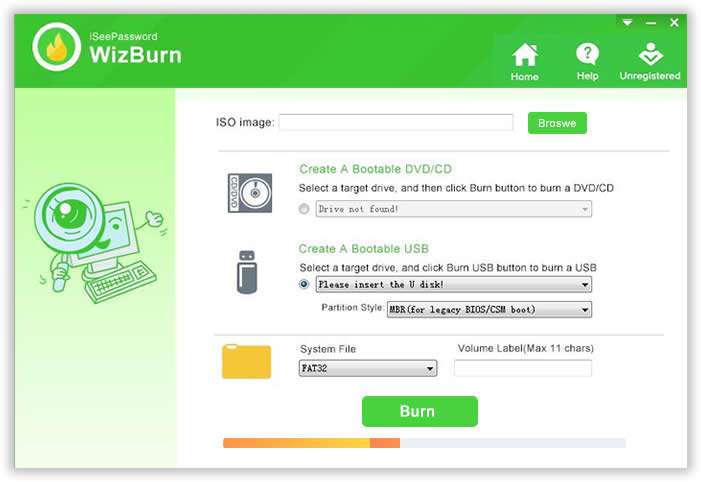
Step 3. Click on “Browser” button to bring the specific ISO file for burning.
Step 4. Select “Create a bootable USB” or “Create a CD/DVD” option depending upon the type of disk you have chosen to burn your ISO image file.
Step 5. Now; click “Burn” button to initiate the burning process. You will be warned about the deletion of all the contents of the disk. Click “OK” to continue.
It will take few moments before the burning process is finished, and you get the bootable disk all prepared.
Also read: How to burn ISO file to DVD with 3 steps
#3. WinISO
Making a bootable disk is a mandatory need if your system has been compromised. But you first need to know how to burn an ISO image file into a disk to make it bootable. For such venture, we are introducing a wonderful ISO burning tool called, WinISO. The steps for the following method are erl
Step 1. Download the program and install it with all terms and conditions. Launch the program with admin privileges.

Step 2. When the main interface screen turns up, from the toolbar section click on “Bootable” tab.
Step 3. From the context menu, click on “Import From..” option and a dialogue box would open up. Choose the ISO file that you wish to burn and press “Ctrl + S” to save it. It will be automatically loaded onto the screen.
Step 4. Now; click on “Burn” button just beneath the toolbar to initiate the burning process. When it is done, you will be notified with a message.
CONS:
- It is a much backdated ISO burning tool.
- It works very slowly to burn the ISO image file.
- Trial version only burn 500MB ISO file.
Conclusion:
To burn the ISO image files to a disk is not that a difficult task to accomplish if you know what to exactly rely on. As you have clearly noticed that the first two methods have got some limitations due to which you cannot completely depend upon them for 100% efficient result. But iSeePassword WizBurn is such a tool which has got negligible number of setbacks and thus it is a completely dependable tool. So if you don’t wish to compromise with your device, you better choose WizBurn for your task.
Read more:


