If you have been using Android devices for quite a long time, then you must have come across of this term USB debugging. Fundamentally, USB Debugging mode enables a user to set up a connection between his Android device and his computer with special kind of default software amalgation, called Android SDK (Software Development Kit). So it is possible to enable it after connecting the Android device to a computer via USB cable.
Also read: Best backup apps for Android in 2018
Why Do We Need USB Debugging?
Basically USB Debugging provides you the required access to your Android device which gives you much more freedom to control your device in whatever way you want as it sometimes overwrites the warranty of the device to enable the facilities. For instance, you can start installing custom ROMs, rooting, or running terminal commands with ADB to restore a bricked phone. So you can actually use this power of authority to bring about necessary changes required for your Device.
Now the manual for enabling USB Debugging is a bit different for different versions of Android OS, which are elaborated below in detail:
Part 1. How to Enable USB Debugging on Android 4.0 and 4.1
These are the earlier versions of Android OS 4.0 (Ice Cream Sandwich) and 4.1 (Jelly Bean) which contain lesser privileges to exercise yet if your device is running with the following OS, the steps that you need to follow to enable USB Debugging are given below:
Step 1. Turn on your Device and make sure that the device is connected to your Windows or Mac computer.
Step 2. Tap on the “Settings” option from the menu.
Step 3. From the list of setting’s option, choose the “Developers options”.
Step 4. Now; Check the USB Debugging checkbox adjacent to the USB Debugging option to enable it.
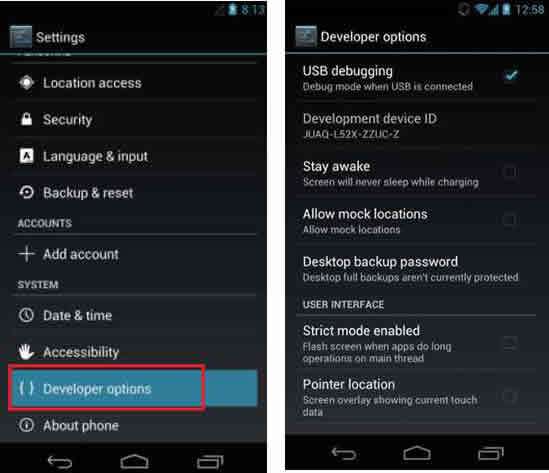
NOTE: You will get a pop-up notifying that you are now the developer and can proceed. Simply press “Ok” to continue.
Don’t miss: 3 ways to unlock Android lock screen
Part 2: Enable USB Debugging on Android 4.2 or Newer
These are the latest versions of Android OS which has paved way to better facilities, faster launching features, and effective touch analysis by the sensors, and smoother operation with latest applications. The steps for enabling the USB Debugging are exemplified below:
Step 1. Firstly, Turn On your Device and keep your Android device connected to your computer via USB cable.
Step 2. Now tap on the “Settings” from the menu.
Step 3. Go to the “About phone” option and select it.
Step 4. Scroll down to the bottom of the following page and press the “Build Number” 7 times in a row. You will instantly receive a pop-up notifying that you are the Developer.

Step 5. Now; go back to the “Developer options” menu and check the USB Debugging option. Press “Ok” on the prompt to proceed.

There you go! You can now enable or disable it whenever you want depending upon your requirement from the “Developer options”.
Conclusion:
USB Debugging is an enhanced mode basically required by those users who tend to root their phone or wish to bring about modification bypassing the default barriers setup by the manufacturers. It in a way makes you the developer of the device once enabled and you get the full control upon the device. But make sure that once the operation has been done, you better disable it lest it can be exploited as well by someone who knows the intricacies of the matter.
Also read: