It has been noted lately that mostly if a user is asked to transfer an ISO file or to burn it into a DVD, he simply copies the image file and paste it into the DVD. Well, this is not burning literally means. Just for the record, the straightaway copy and paste procedure has got nothing to do with the burning process of ISO image which basically is an integrated module of several files compressed into a single image file (ISO). To burn the ISO image file means to create a separate boot sector in the flash drive or the DVD, where the compressed files within the ISO image can become readable and thereby we call the drive the bootable drive.
In order to do that, we required specific applications or tools to burn ISO image files which come with .iso extension. Many seemingly favorable tools are verily available on the internet market, but very few are really worth trusting. Here in this article, we would depict two wonderful tools to help you gain a knowledge on how to create a bootable DVD from ISO file.
Don’t miss: How to burn a ISO file to DVD
Method #1: Make A Bootable DVD from ISO using RMPrepUSB
The first and the foremost thing to do is to download the RMPrepUSB tool on your computer to make a USB drive bootable enabling it to easily access the ISO image files. The distinguishing feature of this tool is that it does not need to be installed. Just save it on your computer and it will run by a mere double-click on it. The steps to use this wonderful tool are explained below in the following manner:
Step 1. Once the tool program file is downloaded on your computer, locate the file in your hard drive. Double-click on it and it will run automatically without any need of installation. So basically there will not be registry entries.
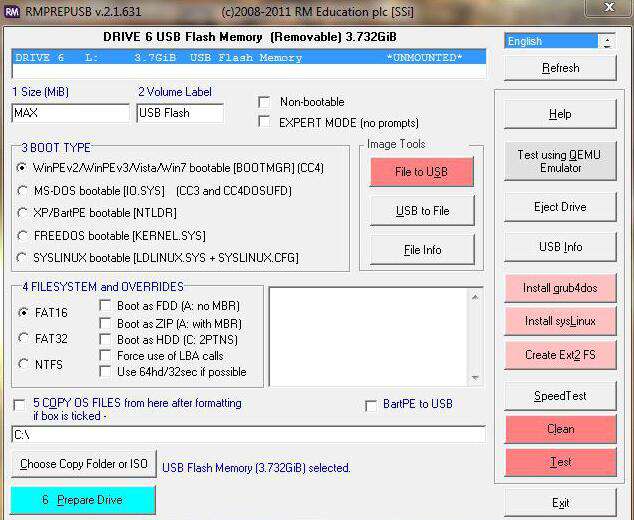
Step 2. Now insert the USB drive that you wish to burn the ISO image files to. RMPrepUSB would automatically detect your device connected to the computer port.
Step 3. Select the drive from tab labeled “Device”. You can see the name of the device and the amount of free space available to the drive.
Step 4. Do not bring about any changes to the three fields, labeled as “Partition Scheme and Target system type; Cluster Size; and File System”. Leave the “Bootloader” section as the default settings are the most appropriate ones.
Step 5. Once everything is selected, click on “Prepare Drive” at the bottom pane. This will initiate the process of making the bootable disk by burning the ISO image files into the selected USB drive.
NOTE: You will get a warning notifying you that all the data will be wiped off the hard drive. Simply click “OK” to continue and to create a new partition.
Step 6. When the bootable disk creation is complete, you will be notified that the disk is created. If you wish to test, you can do so by clicking the “Test” button on the right side of the pane. Once tested, you can now eject the USB drive to connect to any certain computer to carry out your specific task.
CONS:
- It takes a lot of time to burn the ISO image file.
- It is an outdated version so the tool might not be compatible with your Operating system and the system files.
- Fairly complicated
Also read: Fix Windows won’t boot from DVD
Method #2: Create A Bootable DVD from ISO with WizBurn Tool
iSeePassword WizBurn is a yet another flawless tool which helps to make a bootable DVD and USB drives at the stroke of 1 click. From the last few months, it has been showing exponential customer demand because of its smooth and effective performance.
Key Features of WizBurn:
- Create a bootable DVD/USB by burning the ISO image files.
- It is very fast, rather faster than any other program available online.
- The user can change the drive format to FAT, FAT 32, NTFS, etc.
- It fully supports two partition modes- MBR (Legacy BIOS/CMS boot) and GPT (UEFI boot).
- No technical skills are required. No network connection is required.

Step 1. Firstly download WizBurn file and install it on a spare working computer, and run it with admin privileges.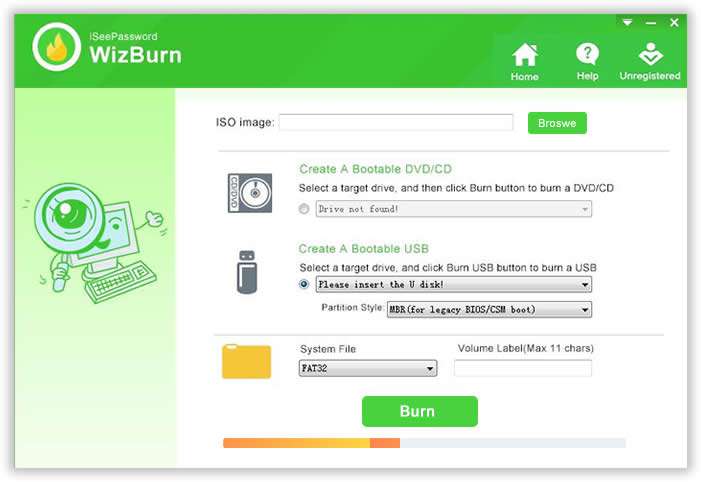
Step 2. Once the main interface screen appears, simply click on “Browse” button to import your ISO file to the program main UI.
Step 3. Select either “Create a Bootable CD/DVD” or “Create a Bootable Disk” depending upon the drive you are choosing. Currently we are choosing the “Create a Bootable Disk”.
Step 4. Select the type of your format from the “System file” option.
Step 5. Once you are done with all of your selection, click “Burn” button to burn the ISO image file into the drive. You might get a warning as your device contents may get destroyed. Click “Ok” to continue.
Wait for a moment. Within few minutes, your disk will be ready as the bootable disk containing the burnt ISO image files and not the copied ones as previously mentioned.
Conclusion:
From the above discussion, it is quite clear that out of the two methods mentioned, only the WizBurn tool is the most reliable tool of all. The first method tool possesses certain of downsides of slower performance rate, whereas WizBurn retains no such setbacks. Thus when it comes to burning the ISO image files of softwares and operating system, use WizBurn to accomplish your task.
Read more:


