Creating USB driver in the latest Windows version has become a lot easier with the in-built ISO burners. Gone are the days when you used to download an ISO image file of the operating system and burn it into CD/DVD. USB flash drives has completely destroyed the usage of CD/DVDs and the main reason is its size, speed and portability. Bootable USB drivers simply means that you are preparing a USB flash drive to install an operating system. Essentially, creating bootable USB drivers to install operating system of your choice varies from each Windows and Mac versions.
In this short guide, we will show how to make or create a bootable USB from ISO file on all Windows version computers. Making a bootable driver is not similar to copying an ISO image file directly on the USB flash drive. Before creating a bootable USB from ISO, please remember to backup all data contained on your USB flash drive as using any trick from this guide will entirely wipe the data from your USB drive.
If you're locked out of Windows 7 and can't recall the password at all, don't worry, resetting Windows 7 password will be extremely easy with the help of Windows Password Recovery Pro.
Method #1: Make Bootable USB from ISO Using Command Prompt
This part can be applied from any Windows version including Windows 10, 8, 7, XP and other older versions. It is indeed an old-fashioned method but it works like charm all the time. Here's what to do –
Step 1. Insert the USB flash drive on the computer and let the computer automatically detect it.
Step 2. Click on Start and start command prompt.
Step 3. Type "DISKPART" and press enter to start the disk part utility.
Step 4. From here, you will have to enter a series of command. First, type "List Disk" to see all the available drivers on the computer. Check the disk number of your flash drive and remember it.
Step 5. Next, type "Select Disk 1" considering Disk 1 is the USB flash driver and press Enter.
Step 6. Now keep on typing these series of commands.
- Clean
- create partition primary
- select partition 1
- active
- format fs=fat32
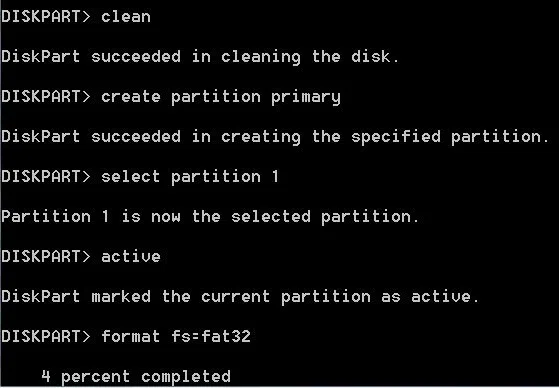
When the formatting process is completed, simply type "Assign" followed by exit.
Step 7. Now copy all the files of your operating system on to the USB flash drive and it is done. You can now install your operating system using the bootable USB flash drive.
Method #2: Create A Bootable USB using iSeePassword WizISO
Making a Windows install disk isn't as simple as formatting a drive or copying ISO file to your USB drive on Windows and Mac OS X. You need to use a professional ISO Editor to write the ISO image to your USB instead of copying. Are you confused with the steps mentioned in above parts or they just didn't work? If that was the case, then it is the time to give a try on iSeePassword WizISO, it's an amazing tool to burn ISO image to USB with a built powerful burning engine.
WizISO a ISO Toolkit which allows you to burn ,extract, edit, create and copy disc without losing the bootable information. This program provides two partition style MBR and UEFI model which allows you to make UEFI bootable drive. What's more. If you want to edit your ISO file,then just import it to the program and directly edit, add, delete, rename your ISO file then save it to a standard ISO format. . It supports 200+ USB brands mo matter it is old or new. The most important part is that it is super easy to use. Not convinced? Please check the tutorial below:
Step 1. Download iSeePassword WizISO from this website and install it on the computer. (Windows version and Mac version all available).
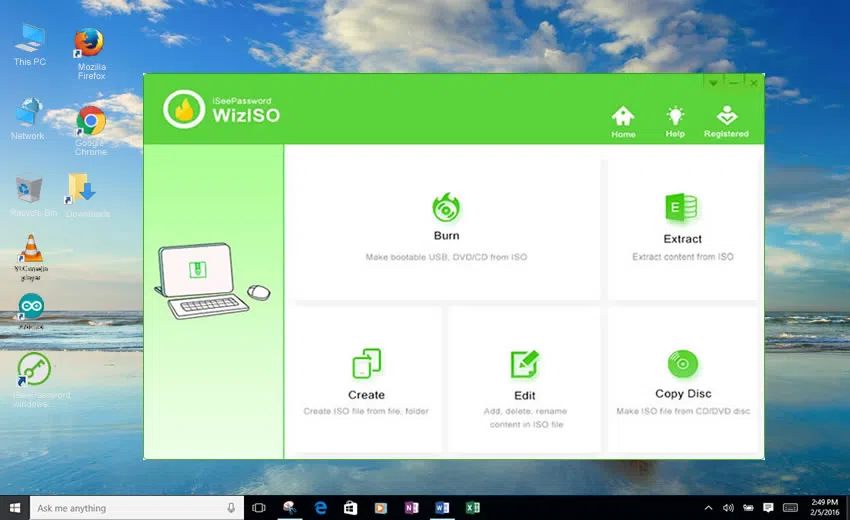
Step 2. Open the program after installation and the main interface is shown like blow.
Step 3. Click "Browse" button to find local ISO file and add it to computer.
Step 4. Now insert an USB drive to the computer and select the drive name from the list undert "Create A Bootable USB".
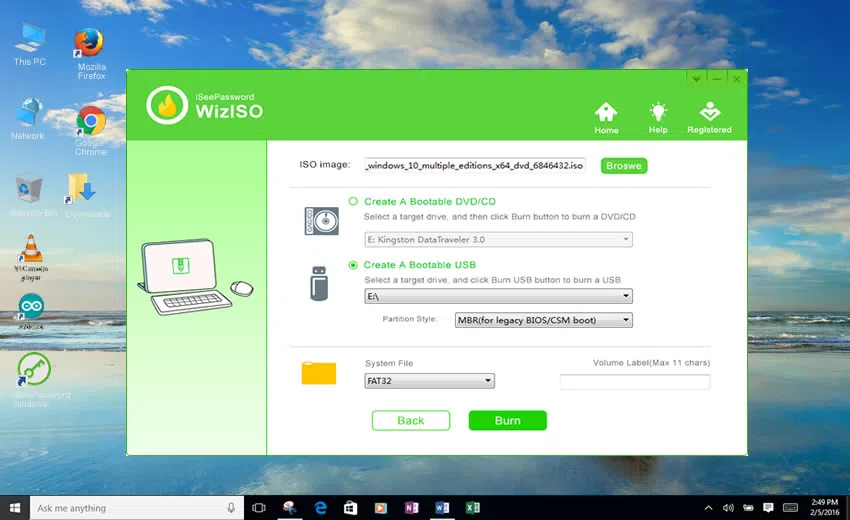
Step 5. Finally, click "Burn" button to start the burning process. It will take around 15 minutes to fully write the ISO file to USB. The actual time is depending on how lagre the file is. After that, you can take out the USB and use it to fix system issues.
Pro:
- High success rate with strong burning engine.
- User-friendly interface that everyone can use it freely.
- Take less time for burning.
- Support both DVD and USB as burning media.
- Automatically detect correct file format before burning.
Method #3: Make Bootable USB from ISO using RMPrepUSB
RMPrepUSB is yet another ISO image file burning program that helps to create bootable USB flash drives. It is absolutely free to use and it's an open source tool. Learn how to use Rufus.
Step 1. Download it from the official website and store it on your computer.
Step 2. It's ready-to-use program that needs no installation at all. You can open the program just by double clicking on it.
Step 3. Insert the USB flash drive and let it be recognized by the program automatically.
Step 4. Select the device name that you are using. It is recommended to use an 8 GB flash drive to run everything smoothly. Leave the rest of the options to the default settings and select the ISO image file stored in your computer. Make sure to check "Create a bootable disk" to make the USB driver bootable.
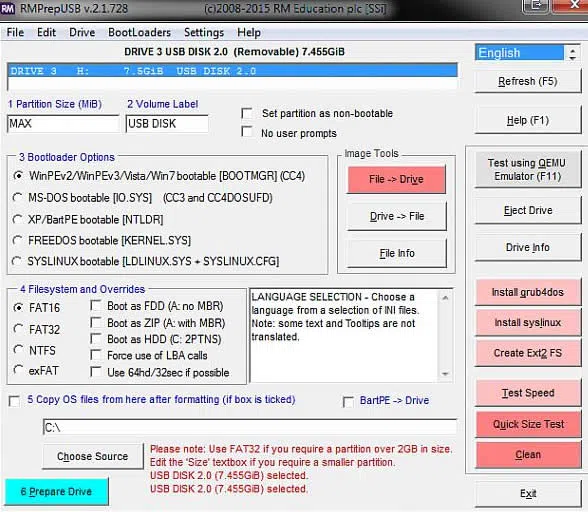
Step 5. Click on "Start" to initiate the burning process and once it is finished, you can eject the flash drive. It now a ready-made bootable USB driver.
Cons:
- Quite complicated, not intended for the beginner.
- Don't support UEFI boot.
- Don't provide any support.
Creating a bootable USB flash drive can be really a hectic task if you don't know the right procedure. Hopefully, you guys were able to create a bootable USB driver by using the methods shared in this guide. If you have any easier method than this then don't forget to share it with us. Stay tuned for more!