
In previous versions of Windows operating system before XP, there was only one Administrator account available but on the later versions of Windows OS like Windows 8, Windows 10, there has been introduced another Administrator account which is termed as Super-administrator account. Actually when you install your Window operating for the first time, you create the main account of yours which is the Admin account.
But two other accounts are also generated unknowingly by default by Windows. One of them is Guest user account, which has less admin privileges with no password protection. You cannot install and run several programs restricted on that account as it has got restrictions.
And then there is this hidden admin account, termed as Super-Administrator account which usually remains disabled until enabled by the user for various elevated tasks such as troubleshooting etc. which requires admin privileges. It is similar to “Root” account in Linux.
Why Super-Administrator Account Remains Hidden?
The Super-Administrator account unlike the main Admin account is created by blank password. That means if it were not hidden, anybody could have access to your system with admin privileges as there is no password protection to hinder the unknown user.
Thus it is by default made hidden so that any stranger cannot use your system with admin privileges, until it is activated with password to ensure safety.
Now; here in this article, we would demonstrate you few methods to enable this super-admin account. Keep reading to know the tricks to activate your Super-Administrator account in Window 10.
Method #1: Activate Super-Administrator Account Using Local Security Policy
There are many exceptional loopholes in Windows OS configuration through which various modifications can be done from host’s files to consoles. Here we would use one such policy called Local Security Policy to activate the Super-Administrator account. Read below to know the method description:
Step 1. Turn on your system, and press “Ctrl + R” to open the small “Run” command box at the bottom left corner of your Windows screen.
Step 2. In the blank search box, input “secpol.msc” and hit “Enter”.
Step 3. Once you hit “Enter”, your Local Security Policy would open up.
Step 4. Go to the left side of the panel and click on “Local Security Policy”. Then click “Local Policies”.
Step 5. From the sub-menu, click on “Security settings”.
Step 6. On the right side of the panel, search for the entry named “Account: Administrator account status”.
Step 7. Double click on “Account: Administrator account status” entry to open its properties dialog.
Step 8. Now, in the property window, under the “Local Security Setting” tab, select the “Enabled” option and then click “Apply” to enable the hidden administrator account.
Step 9. Restart the computer once to complete the process.
You can disable the account simultaneously by selecting the “Disable” option from the property window.
Don’t miss: How to Fix Windows Taskbar Not Working Issue?
Method #2: Activate Super-Administrator Account Using Command Prompt
Command prompt is a command-line interpreter which can accomplish several difficult tasks just at the stroke of few commands. Here we would use this black dialog box to enable our Super-Administrator account and also add password to this account using certain commands as well. Read below to know the method in steps:
Step 1. Type “cmd” in your search box, and right-click on it and select “Run as administrator” to run it with all the admin privileges.
NOTE: You can press “Ctrl + Shift + Enter” after you type “cmd” on the search box to directly launch it with admin privileges.
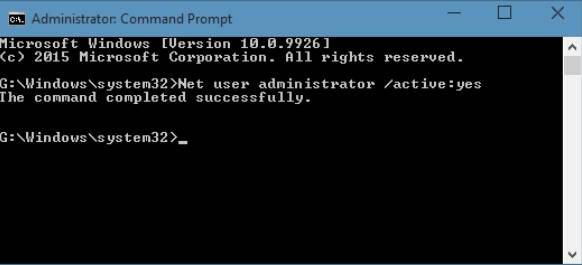
Step 2. When the elevated command prompt box appears, type the following command and press Enter:
Net user administrator /active:yes
Step 3. If you want to set up a password for the Super-Administrator account type the following command in below the previously mentioned command:
Net user administrator password
Net user administrator /active:yes
Step 4. If you wish to disable the super-admin account after your job is done with the account type in the following command:
Net user administrator /active:no
Method #3: Activate Using Local Users and Groups Windows
Local Users and Groups window is a special feature of Windows to manage several users and groups that are locally saved in your system. So in this method we would use this feature to activate the Super-Admin Account. You can also set password for your super-admin account with the help of this feature. Read the instructions below to know the method in detail:
Step 1.Press “Ctrl + R” to open the “Run” command box, and type in “lusrmgr.msc” and click “Ok” to open the Local Users and Groups window.

Step 2.On the left side of the panel, select “Users” folder to get the list of account names on the middle of the panel.
Step 3.Find out the entry “Administrator” and double-click on it to open its property panel.

Step 4.Now; under the “General” tab, uncheck the option “Account is disabled”. Click on the “Apply” button finally to enable the super-admin account.

Step 5.If you wish to safeguard your super-admin account, right-click on the user account and choose “Set Password” option to set a password for the account.
Conclusion:
Super-Administrator account can accomplish all that your main admin account can do, but since it is hidden you are unable to access it even without knowing it exists.
If you ever forget your Windows password, you can enter your system using Super-Admin account to reset the main admin account password again. This is one the major advantage of enabling super-admin account. But since by default it has no password protection, better set a password for this account once enabled otherwise, unknown or guest users can start to access your system with admin privileges.
Related Articles:


