
Windows 10 taskbar is very convenient as it provides you the platform to perform multi-tasking, such as handling multiple desktops, to run shortcuts, especially Cortana the function introduced in Windows 10.
While working on your PC have you ever come up with intermittent issues where your Windows 10 taskbar is not functioning properly? This is not something uncommon among users to have issues with Windows 10 UI components, like Windows taskbar. Sometimes, icons on the Taskbar do not become visible, or it freezes, while switching from window to window.
List of Problems with Windows 10 Taskbar
- Windows 10 taskbar not hiding when you are trying to hide it.
- Taskbar is missing.
- Windows 10 taskbar is only working after system updates.
- Windows 10 taskbar auto-hides without admin permission.
- Icons on the taskbar are not visible.
- Shortcuts in the taskbar are not opening on clicking on them.
Thus if the issue is not attended with immediacy, it would greatly affect your performance and work rate. This article would demonstrate two such techniques to resolve your problem at one go. Simply go through the methods mentioned below to ensure complete rectification.
Don’t miss: How to Enable or Disable Settings in Windows 10?
Method #1: Restart Windows Explorer
This method is quite simple to attend to, as it does not involve any major system changes. Sometimes, the background processes or tasks get stuck due to overflow, and impedes the usual operation of the system. The restarting of Windows explorer process in the background would simply restore the taskbar to its normalcy. Go through the steps as mentioned below to bring back the taskbar again:
Step 1.Press the “Windows logo key + R” to open the “Run” dialog box at the bottom left corner of the screen.
Step 2.In the blank search field, type “taskmgr.exe” and hit “Enter”. It will open up the Task manager window instantly.
NOTE: You can also open the task manager by right-clicking the taskbar at the bottom. But since the taskbar is not functioning properly, we have to manually open it using RUN.
Step 3.Now; among all the tabs, go to the “processes” tab, navigate down till you find “Windows Explorer” process in the list.
Step 4.Click on the “Windows Explorer” process to select it. Once it is selected click on the “Restart” button in the bottom right corner.
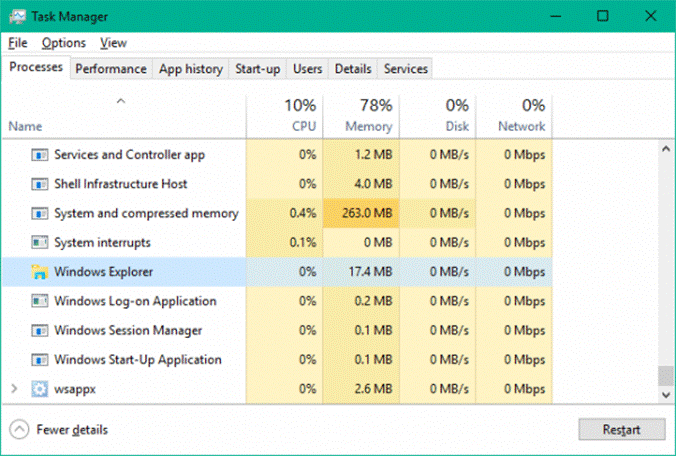
Step 5.This would simply kill the Windows Explorer process and would definitely resolve the issue if it is not that critical.
The system will restart before it brings the Taskbar back to its normal order.
But, if the process is still not working as per your expectation, better try out the next method to pull off the job.
Method #2: Re-registering the Taskbar Using Windows 10 PowerShell
If the Windows Taskbar Not Working, you still have another method to fix it. In this method you don’t need to manipulate or mess with other system settings, all that you need to do is to give some command lines in the PowerShell, which is enough to do the job. If the issue is not that critical, it will restore the Taskbar to its working order like before.
So, what have you got to do is as follows:
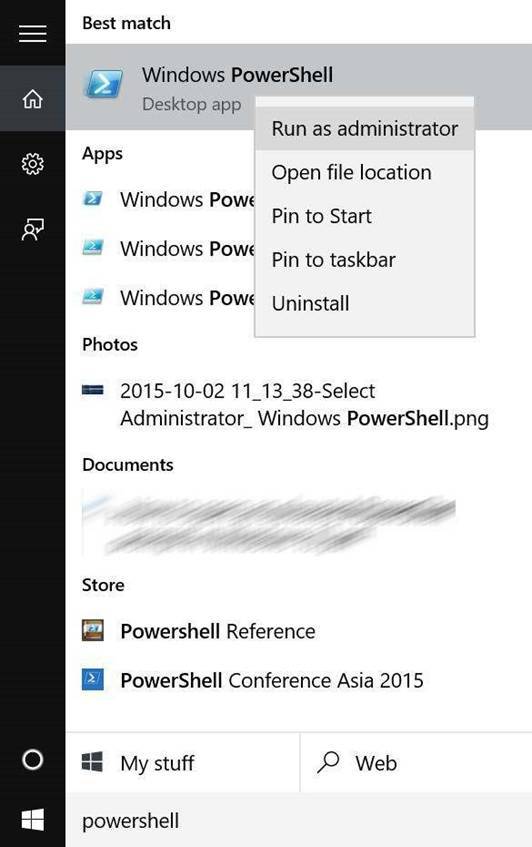
Step 1.Go to the Windows start menu, and click on it.
Step 2.Type PowerShell, and from the result right-click on the PowerShell option to select “Run as administrator” to run PowerShell with admin privileges.
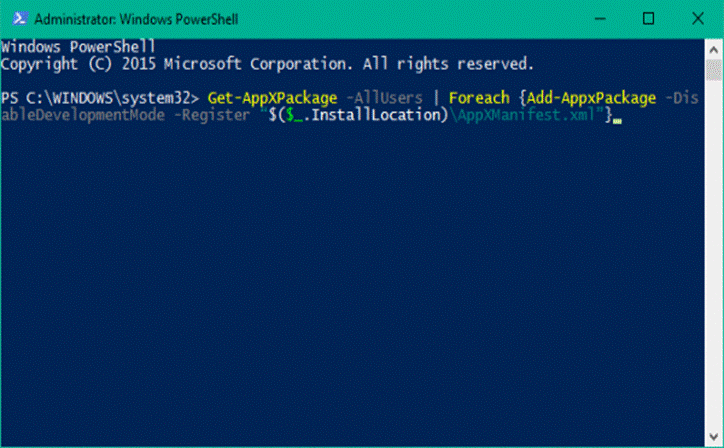
Step 3.Now, once the blue dialog box of PowerShell turns up, copy paste the following command lines:
Get-AppXPackage -AllUsers | Foreach {Add-AppxPackage -DisableDevelopmentMode -Register “$($_.InstallLocation)AppXManifest.xml”}
Step 4.The process will take a little time to execute successfully.
Step 5.Once the command line has been executed successfully, go to the following directory in the File Explorer, and replace your name with your User Account name. Before you do that, make sure that you enabled showing of hidden items in Windows File Explorer.
C:/Users/name/AppData/Local/
Steps 6.Scroll down the folders in the list to locate the file named “TileDataLayer” and delete the folder.
NOTE: If you are somehow unable to delete the folder, launch the services.msc to open the service manager. Locate the folder named “Tile Date model layer” service and stop the process. Now go back to the previous folder in the file explorer, and try to delete the folder again. This time, it would surely be deleted easily.
Now go back to the desktop and check if your taskbar is functioning properly or not. If the issue is not that serious, these aforementioned two methods would be sufficient enough to resolve the issue.
Conclusion:
As you know the Windows 10 is introduced with certain changes which were not previously present the former Windows OS versions, thus it becomes quite difficult for the user to work efficiently with the problem persisting. The methods mentioned above are not hard to apply. Even a novice with computer can easily carry out the methods easily just by following the above guidelines to fix your Windows Taskbar Not Working.
Related Articles:


