
If you are handing over your PC to someone else for a while, you better disable both your Control Panel and Settings app in Windows 10 OS PC. Control Panel and Settings app are the main two interfaces from where all the default settings of your Windows 10 OS can by modified and messed up as well if fallen on wrong hands. Thus it is recommended to disable the settings when you let any random user use your PC.
Settings app in Windows 10 is actually meant to replace the traditional Control Panel dependency, and thus most of the default features and settings of Control Panel are incorporated in the settings app of Windows 10 too. Whether you configure Control Panel or Settings app, both can do wonder and blunder at the same time depending upon who is using the system.
So in order to secure your system from such intrusion, we would discuss few simple methods here to let you know how to disable and enable your system settings as per your need.
Don’t miss: User Profile Cannot be Loaded on Windows – How to Fix
Method #1: Enable or Disable Settings via Registry
Just like Group Policies, if you are on Windows 10 Home edition, Windows Registry can help you enable or disable system settings at the call of certain changes. We recommend you to create a backup of the Registry entries before you edit them as it can be fatal if anything goes wrong with Registry modification. The method is described below in simple steps:
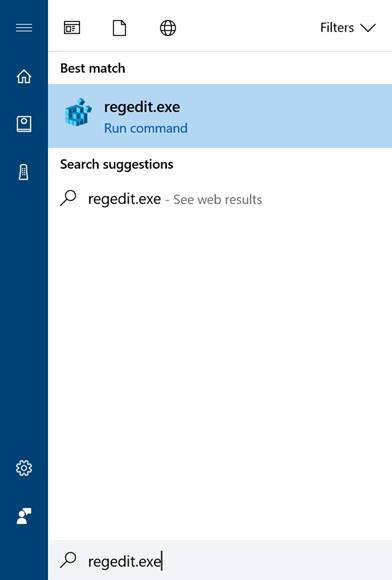
Step 1.Type Regedit.exe in start menu/ taskbar search box to open the Registry Editor. Click “Yes” if user account confirmation screen appears.
Step 2.Once the Registry Editor opens up, go to the following key:
HKEY_CURRENT_USERSoftwareMicrosoft WindowsCurrentVersionPoliciesExplorer
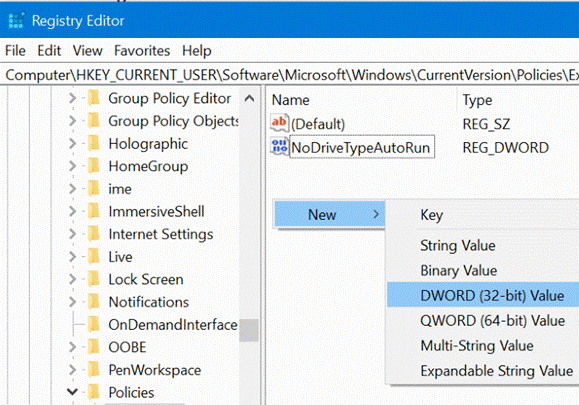
Step 3.In case the “Explorer” key is not present right-click on the “Policy” key. Click “New” and then “Key” and name the new key as Explorer.
Step 4.Right-click on an empty place on the right side of the pane. Choose “New” and then “DWORD (32-bit) value”. Rename the newly set value as “NoControlPanel”.
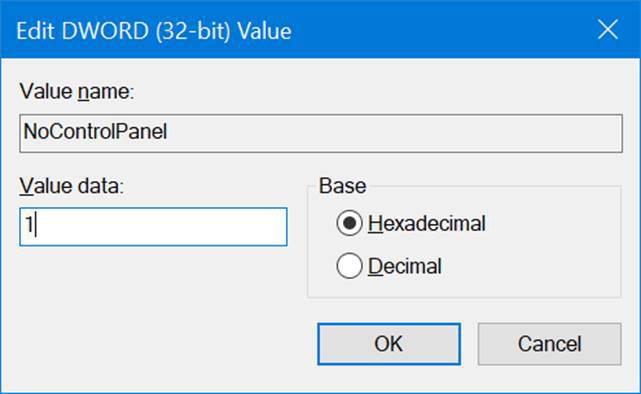
Step 5. After you have done this much, double-click on the “NoControlPanel” value and set the value to 0 to disable the Control Panel and Settings App altogether. You can enable them by again changing the value from 0 to 1.
Method #2: Enable or Disable Settings via Group Policy
Local Group Policy Editor is a feature, through which you can manage and edit local policies stored in your system and here we would use it to enable and disable settings in Windows 10. Though it is a bit risky, if you are not adept with the complexities of your system, thus be cautious while working with Local Group Policy Editor. Otherwise It can render fatal changes to your system if mishandled.
The method is executed in the given steps:
Step 1.Input ‘gpedit.msc” in the search box and hit “Enter” to open the Local Group Policy Editor.

Step 2.Click on “User Configuration” tab from the left-side list of the panel.
Step 3.Select “Administrative Templates” and from the context menu, and then click on “Control Panel”.
Step 4.Now; you can see several entry names on the right-hand side of the pane.
Step 5.Find out the policy named “Prohibit access to Control Panel and PC Settings”.
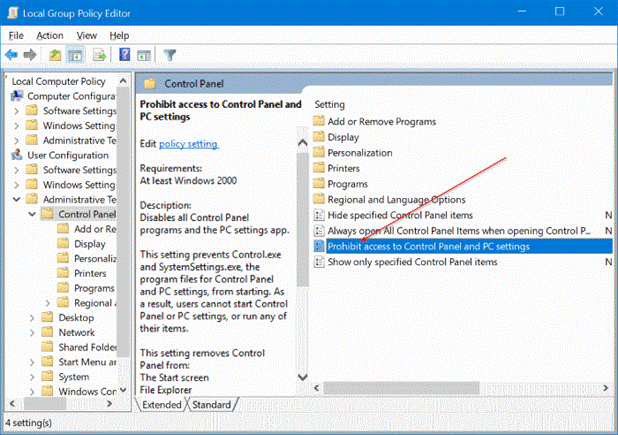
Step 6.Double-click on the “Prohibit access to Control Panel and PC Settings” policy entry and you will see now the “Properties” dialog box.
Step 7.From the following Properties Window; select the “Enabled” option to disable the settings on Windows 10.
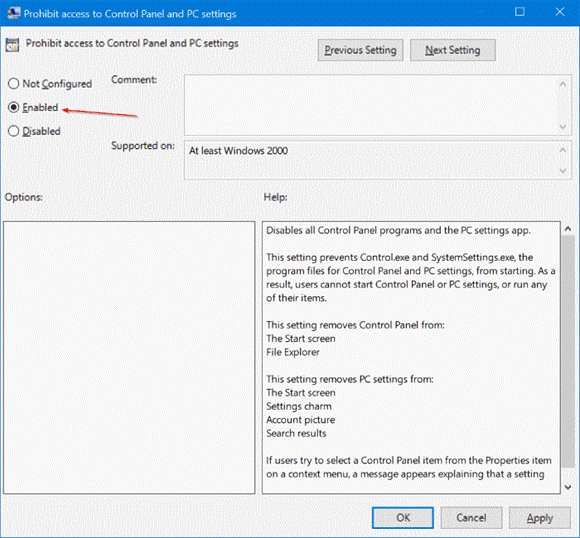
Step 8.After you have selected Enabled option, click on “Apply” button to save the changes.
So, now onwards, no random user will be able to open your settings without your permission, thus your system is safe for the time being.
NOTE: If you wish to enable the settings again, select the “Disable” option to let the settings appear again.
Method #3: Enable or Disable using Windows 10 Control Panel Hacks
If you don’t feel like going through the hassle of Registries and Group Policies to disable or enable your system settings, there are two registry hacks that can be used as an alternative to disable and enable system settings like a third-party utility.
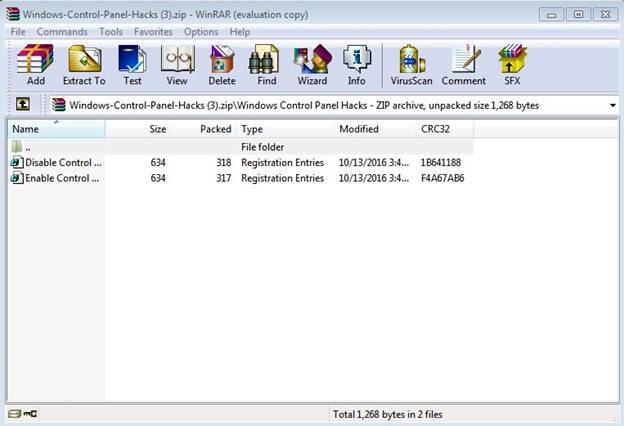
Out of the two hacks file, one hack disables the Control Panel access whereas the other hack enables the access. The two registry hacks are compressed together in a ZIP file which can be downloaded from the web.
Read the instructions beneath to know how to make them work:
Step 1.Download Windows Control Panel Hacks from Internet which is actually a ZIP file containing two hacks.
Step 2.Click on the ZIP file, and there you shall see two hacks, one for disabling access and another for enabling access to your Control Panel access.
Choose according to your need and your settings will be restricted from opening without your authority.
Conclusion:
Most of the settings of Control Panel have been lately included in Windows 10 Settings app to make the experience more comfortable. As the conventional Control Panel access is a bit confusing while changing the settings, Settings app in Windows 10 shows the settings and in-built features with clear cut differences and you can easily choose your options.
Thus the methods mentioned in this article would definitely help you to disable and enable your system settings as per your requirement to ensure safety against misuse and system exploitation.
Related Articles:


