Many a times you might have seen some transparent images or texts scribbled underneath your documents. These superimposed patterns are called WATERMARK. Traditionally, a water coated stamp or a Dandy Roll was made to roll over the paper during its elaborate manufacturing. It is very important for maintaining the copyright of any documents. It helps to prevent an image or document from being copied or allow others to know where the document is copied from and who owns the right.
It can be a text, an image, or a logo which indicates certain information about the owner of the document, such as websites, name of a company, name of a person, an organization name, etc. While adding watermark to any document like in case of digital watermark, the owner makes sure that the watermark is more or less visible or transparent in such a way that it is hard to be noticed. Thus it doesn't interfere the visibility of the actual data which superimposes the watermark.
This article gives 4 ways to add watermark on PDF files.
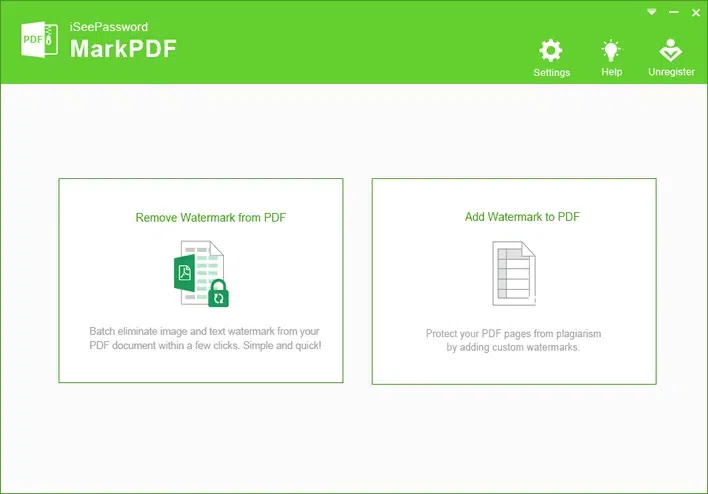
Method 1: Add Text/Image Watermark to PDF with MarkPDF
MS Word program indeed create watermark to a PDF files but it may destroy the data structure and can't be correctly viewed in the PDF reader. If you want to make your confidential PDF file copyright protected to potential unauthorized use, you need to select the professional PDF watermark creator software like iSeePassword MarPDF. With it, you can easily add any type of text and image watermark on your PDF files and it allows to permit its customization accordingly. And the text or image watermark can be stamped behind virtually every elements of a PDF file. It can be able to watermark 300 PDF files within 1 minutes without crashes.
1 Download, Install the MarkPDF on Your Computer.
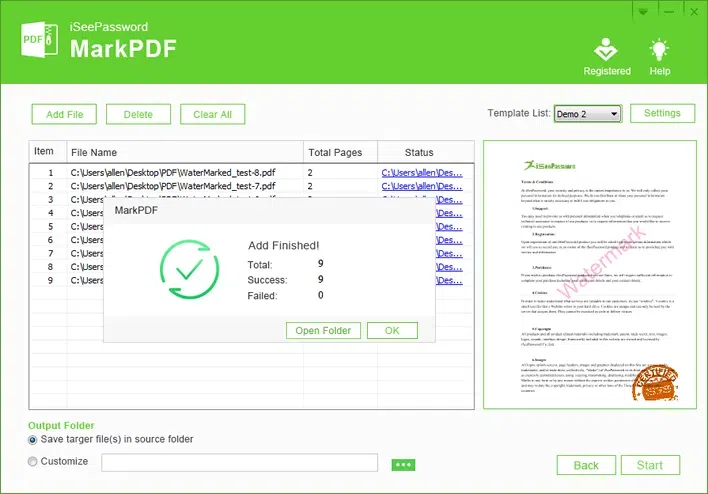
Firstly of all, download and install the MarkPDF watermark creator tool on your computer, Windows and Mac are all available! Then run it as admin, and you will see the main interface like below. It has a slicker interface.
2 Add PDF Files to MarkPDF
Select the option “Add Wamtermark to PDF” and go to the next Window. Here you need to click Add File button to import your PDF files. You can add one or batch.
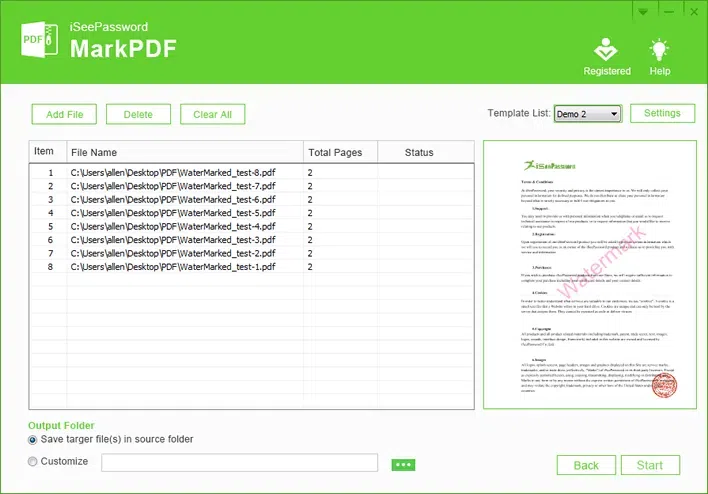
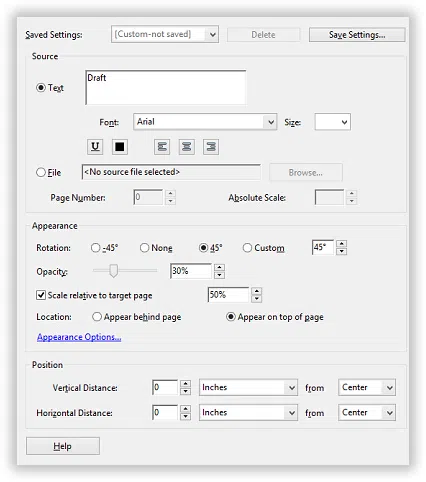
3 Create Your Own Watermark Templates
MarkPDF uses the template to manage your all of your pre-created watermark settings, your’re allowed to create a lot of different watermark templates and saved in the program.
Add Text Watermark to PDF:
You can adjust: Font style, size, color, opacity, rotation, tile style, position, layer and page range.

Add Text Watermark to PDF:
You can adjust: image width, height, opacity, rotation, tile style, position, layer and page range.
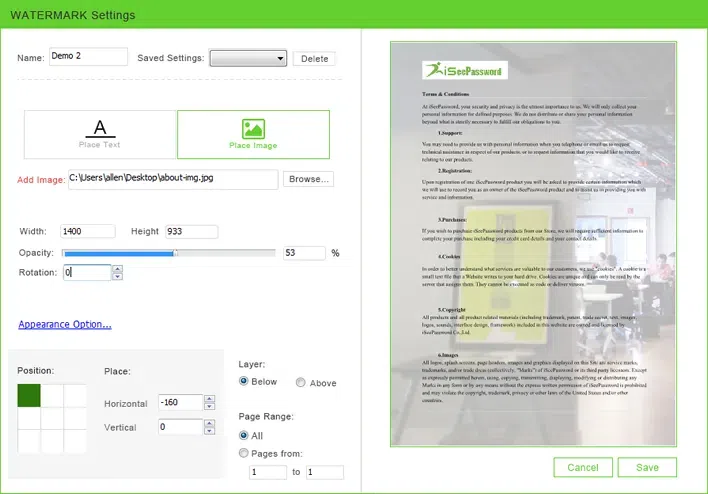
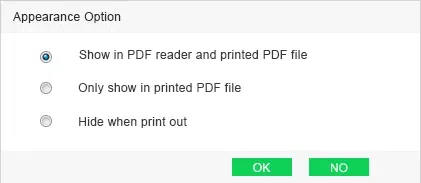
Make Your Watermark: Show or Hidden in the Printed PDF
Click the Appearance Option, then you can make your watermark show or hidden when others trying to print your PDF files.
3 Start to Watermark Your PDF Files
When the template settings is complete, click the Save button to save your template, then click Start button to add the newly created watermark to your PDF files. You can create more different watermark templates, then select targeted template from the list then apply to different PDF files. That’s very convenient!
Undoubtedly, MarkPDF is a prevalent software for desktop users to add watermark, remove watermark and update the watermark to PDF files effortlessly. It’s so much better than any other watermark tools like photoshop, Microsoft word even Adobe.
Method 2: Using Microsoft Word to Add Watermark to PDF
Step 1. Type the entire document in which you want to add the watermark, or keep the document somewhere safe which will be copied into the page containing the watermark.
Step 2. Go to the "Page Layout" option in the upper Menu Bar and click on it.
Step 3. A certain panel comprising many other sub panels would come to the forefront.
Step 4. Under the "Page Background" panel there you would see the "Watermark" option.
Step 5. Select the "Watermark" option by clicking on it.
Step 6. On clicking the "Watermark" option, a box containing varying patterns would appear below the "Page Background" panel.
Step 7. If the default available patterns are not suitable for you, you can customize your own watermark from choosing the "Customize Watermark" option below the patterns.
Step 8. After clicking the "Customize Watermark" option, you will see a box with "Printed Watermark" written on its head.
Step 9. The box contains three options of adding watermark to your documents, you can also add watermark into MS word.
Option 1. "No Watermark"
This watermark option can be used as an undo option to remove the watermark from the document in case any present in the first place.
Option 2. "Image Watermark"
This option is implemented to add images or logos as watermark in the document. By choosing "Select Image" option in it, you can select any image saved in your directory.
Option 3. "Text Watermark"
This option can be utilized for adding specific texts into your document. The language, size, font, color can all be customized as per your wish from the option panels given below the "Text Watermark".
Step 1. Once you are done with selecting the type of watermark you want to add in you document. Select "Apply" and click on it. The chosen watermark will appear instantly as a transparent pattern on the page.
Step 2. Copy the document that you had kept in store from its location and paste it in the watermark labeled page.
Step 3. Save the document by pressing "Ctrl+S" and select save as "PDF" while saving it.
Additional Tip: If you're locked out of your PDF documnet and can't open it. You may need professional PDF password remove tool to crack PDF password without wiping data on it.
Method 3: Add Watermark to PDF by Using Adobe Acrobat XI
Step 1. For the following method to be functional, you first need to download the Adobe Acrobat XI and install it in your computer.
Step 2. Open the software Adobe Acrobat XI.
Step 3. Go to the "Tools" and select "Page".
Step 4. In the "Page" option choose the "Edit Page Design" heading. Select "Watermark" and choose "Add Watermark".
Step 5. Customize the "Watermark Settings"
Step 6. Click on the "Page Range" option and select your desired page range and select "Ok".
Step 7. Click on "Appearance" option and make sure the appropriate check boxes are selected.
Method 4: Add Watermark to PDF Online
This method involves some specific directions which would save you the trouble of going through all these aforementioned manual work. Simply follow the step below and your PDF will be ready with watermark in no time.
Step 1. Make sure the PDF you want to select for adding the watermark is already saved in your computer.
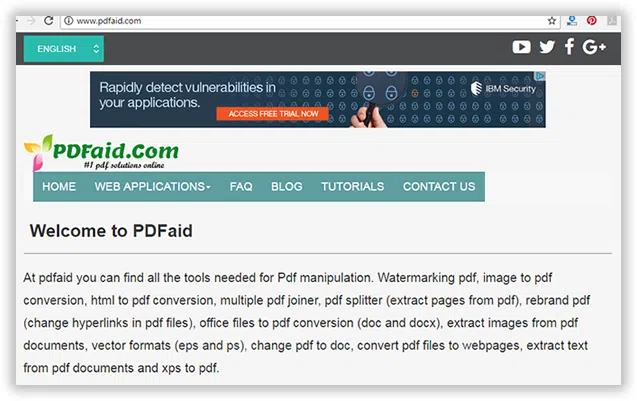
Step 2. Go to the website pdfaid.com. The reference link is given here: http://www.pdfaid.com/
Step 3. Simply copy the link and paste it in the URL panel of your Web Browser, and press "Enter".
Step 4. You will be directed to the specified site immediately.
Step 5. Click on the "Watermark PDF" option and insert your pdf file by selecting " Select PDF file".
Step 6. Add your watermark with your font, size, pattern preference, and click on "Watermark PDF".
Step 7. You will get a preview of the Watermark in your pdf. Select "Download" to download the new pdf containing your desired watermark.
Conclusion:
In the above article, we have tried to explain the ways to add watermark to your documents as simply as possible to you. Simply follow the directions mentioned in this article and your problem will be solved. For more information, don't forget to subscribe our website to collect more information.