With the advent of Microsoft Windows 10 operating system, Windows Start Menu too has made a comeback as it was not introduced in the Windows 8 version. But in spite of the introduction of Start menu, it seems to reportedly have some issues. The most irritating part is that it would not open when you click on the Start menu icon, or if you press the Windows logo key from the keyboard. On top of that, if you press it continuously for a moment, it might freeze the search box adjacent to the Start menu too.
It was believed that the cause might be due to the interruption while the Windows update is being installed, but with recent statistics it is found to be of some sort of bug problem associated with the operating system.
Well, start menu is one of the essential components of the Windows operating system. To access any tool or a program users usually prefer to click on Start menu conventionally rather than trying out short keys all the time. Thus troubling issue with Start menu can really slow down the user’s operating speed and thereby the productivity at work places.
Here in this article, we would discuss few of the remedies which are at their best would help you to fix Windows 10 Start Menu Not Working. Continue reading to know the methods and tricks in detail.
Don’t miss:How to Boot in Safe Mode on Windows 7, 8, 10?
Method #1: Reinstall Windows Apps
Here in this section, we would download and reinstall the Windows apps again to fix a stuck Start menu problem. Now this would not take much time, but you better back up your files, if any you have saved in your Apps. Then follow the given guidelines.
Step 1:Type “Windows PowerShell” in the search box and right-click on it from the result found, and select “Run as administrator” to open it with administrator privileges.
Step 2.Once the PowerShell blue box appears, copy and paste the given link as follows:
Get-AppXPackage -AllUsers | Foreach {Add-AppxPackage -DisableDevelopmentMode -Register “$($_.InstallLocation)AppXManifest.xml”}
Step 3.Wait until the downloading and reinstallation of apps process completes, and then reboot your computer to give it a fresh start, and most possibly your problem will be fixed.

If this method doesn’t work, try out the next one.
Method #2: Replace Corrupt Files by Running System File Checker
Many a times, the files from Windows update get corrupted by bugs and viruses that are frequently invited by the user while using Internet or other external sources. These corrupt files altogether mess up with the system performance and can even prevent the Start Menu from appearing properly. Thus follow the guideline mentioned below to solve the problem.
Step 1.Press “Ctrl + Shift + Esc” key combination from the keyboard to open the task manager.
Step 2.Click on “File” from the menu bar, and then select “Run new task”.
Step 3.Once a short panel with a blank box pops up, type “PowerShell” and tick the check box “Create this task with administrative privileges” into it and hit “Enter”.
Step 4.When the Blue dialog box of PowerShell appears, type “sfc /scannow” on the window and press “Enter”.

Step 5.You will be shown any of the three notifications as follows:
- Windows did not find any integrity violations, which means there are no bugs so fixing is not necessary.
- Windows Resource Protection found corrupt files and repaired them, which means the issues have been fixed.
- Windows Resource Protection found corrupt files but was unable to fix some (or all) of them, which indicates a real problem.
Step 6.When the 3rd notification appears, simply type “DISM /Online /Cleanup-Image /RestoreHealth” and hit “Enter”.
Step 7.This final process will download all the necessary files from the Windows update and replace them with the corrupt files.
There you go, your job is done!
If the problem still persists, move on to the next solution below.
Method 3: Refresh Your PC
As a last ace of the deck, you can refresh your Windows 10 PC which is mostly similar to refreshing Windows 10 installation. It would not affect any of your documents, but you need to separately reinstall applications that are not part of Windows 10.
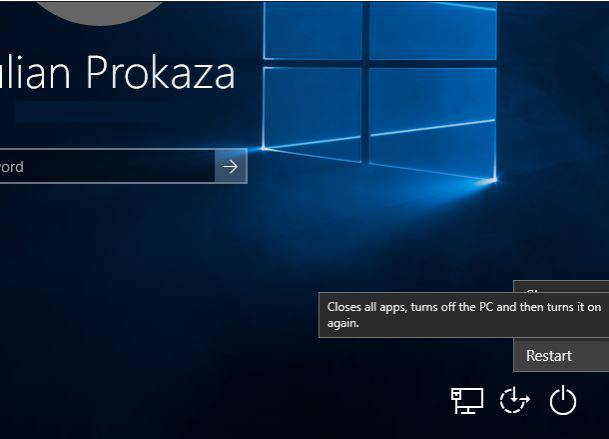
Step 1.Firstly close all your background applications, and press “Windows key + L” to log out of your account. You can restart your windows, and on the login screen, click on the “Power” button.
Step 2.Hold “Shift” key and choose the “Restart” option.
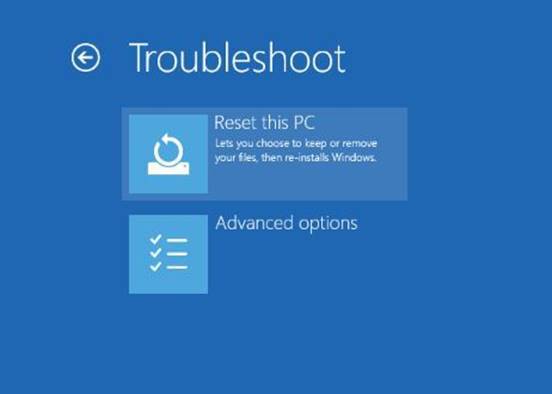
Step 3.Once the “Choose an option” blue screen appears, click on “Troubleshoot”.
Step 4.Then you have to select “Reset this PC” and finally “Keep my files” followed by on-screen instructions to complete the Refreshing procedure.

Conclusion:
The methods mentioned above cannot completely guarantee you the successful result, but the chance of fixing the Start menu issue is considerably high. If the methods still do not seem to work, then run windows update. This would most probably resolve your issue with the Start menu.
Although Windows 10 is very well arranged with all that a user needs, but still in many cases, troubles with many of its components like Start menu in this case, keep troubling again and again. If your problem is concerned with Start menu not working, follow the instructions above step by step, and you can easily resolve your problem at one go.
Related Articles:


