If you are a Windows user, you definitely have encountered some problem at one point or the other. Some problems are common and are easily solved by slight efforts while some are pretty complex and requires expert attention. Also, the troubleshooting totally depends upon the knowledge and the problem-solving ability of the person.
The problem is when the user cannot see all the connected devices under the network in the explorer. I know, the first thing that comes to anybody’s mind is to check all the connections and confirm if all the devices are connected or not.
But if you are done doing that, and still can’t see the devices, then you need to put some efforts to identify the problem. The first thing you should do is to identify the network you are using namely domain or workgroup. If you are using a domain network and are not able to see any network device then there is a possibility that the DNS (Domain Name System) is not properly setup. Also, there are chances that the administrator might have blocked the network for security issues.
So, check the above issues first, before you start to look at different network settings. Moreover, if the above settings are working fine, then here are other possible issues along with their solutions that are not letting you see all the connected network devices:
Part 1. Sharing of File and Printer is OFF
This is one of the basic issues. If the file and printer sharing is OFF then you cannot see the connected devices under network. This protocol is very important if you want to see all the local network devices.
Here are the steps to install the protocol for the Windows XP users:
- Visit Control Panel.
- Click on Network Connections.
- Right-click Local Area Connection.
- Choose the “Properties” option.
Now in the ‘local area network properties’ dialog box make sure that the following check boxes are checked:
– Internet Protocol (TCP/IP)
– Clients for Microsoft Networks.
– File and printer sharing.
Windows 7 and 10 Users:
If you are using Windows 7 or 10, you have to follow the following steps:
 Step 1. Open Network and Sharing Center in the Control Panel.
Step 2. Click on the Change Advanced Sharing Settings.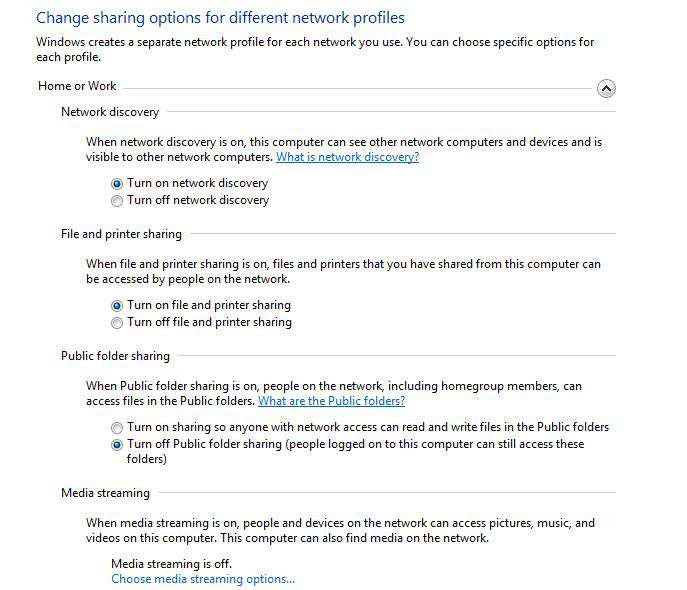 Step 3. Now the private profile option, turn the Network Discovery ON.
Step 4. Also in the lower options check the “allow Windows to manage homegroup connections”
Part 2. All the Computers Are In the Same Work Group:
This is the second thing that you need to check if the settings mentioned in step 1 are fine. For all the computers to show up on the network they should be in a single workgroup or home group.
If you are a Windows XP user follow the steps to check if your computer is in the same workgroup as other connected devices.
- My computer > Properties > Computer Name Tab.
- Now just below the Computer name, you will see the workgroup. Make sure that each computer on the network has the same workgroup as the other.
- If the workgroup is not same, you can click on change button in the lower right corner to change the name.
For Windows 7 and 10 users:
- Right click on my computer and click on properties.
- On the left side click on the advanced system settings.
- Confirm workgroup in the computer name tab.
- Here also you will have the option to change the name of the workgroup.
Part 3. Computer Browser Service:
There are chances that the computer browser system you are using is not enabled. Though this is quite rare, you can check this if the above methods do not work for you.
The default setting of the computer settings is the Manual (Trigger Start) and the status is “running”.
To check the computer browser services follow the steps:
- Click on Start and type “services.msc”.
- You will see the computer browser services there.
- Confirm that the above settings are set to default as mentioned above.
If the above-mentioned default settings are not present, then go to the “system utility” by clicking on Start and then type MSCONFIG.

Now, in the GENERAL tab, make sure that the ‘startup selection’ is checked to normal startup.
So, these are some of the methods which can help you to see all the connected network devices in the explorer. But, if you are still not sure, it is always good to take the advice of an expert who can solve the problem for you effectively.
Related Articles:


