As per the matter of security is concerned, Microsoft would never slacken to compromise it, thus it has introduced several new features and propaganda to enhance the security measures in Windows 10 version. Adding a PIN is one of them which make the sign-in access to your computer easier and more secured. It is similar to sign-in with your Microsoft account. The only difference is that instead of using long passwords which are usually hard to memorize, few digits PIN is all sufficient to log-in.
But the real concern arises, when you try to activate the PIN code feature and it doesn't work at all. So basically what to do now, Right? Relax, and sit back with ease. We would provide you what you need to fix Windows 10 can't add pin password.
In order to know how to fix the problem when you are unable to add a PIN in Windows 10, read the methods as given below to rid your confusion:
Method #1: Delete Files from NGC Folder
NGC folder in Windows 10 basically contains the built-in security protocol files. A mere modification with these files can bring about serious changes to security features. But, sometimes, some of these files get damaged and needs to be eliminated to get the things done. So, this is what we are going to do here now.
Step 1. Firstly, sign-in to your Windows 10 Administrator account using password. (If you forgot admin password, see here)
Step 2. Now; open your File Explorer and browse to the location: C:\Windows\ServiceProfiles\LocalService\AppData\Local\Microsoft
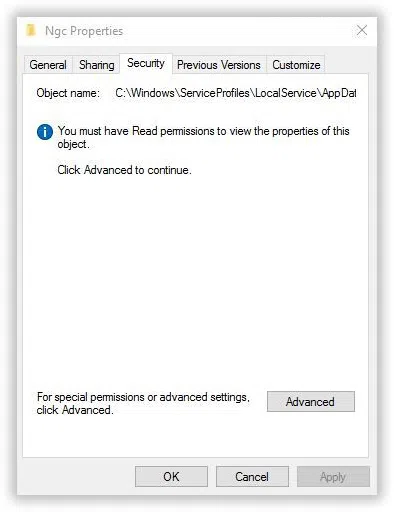
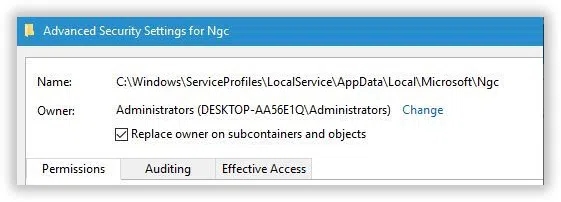
Step 3. Just right-click on the "Ngc" folder and select "Properties" from the context menu.
Step 4. Under the "Security" tab, click on "Advanced" option.
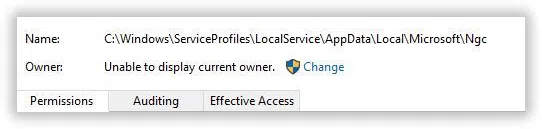
Step 5. From the following window, next to the Owner section, click on the "change" link.
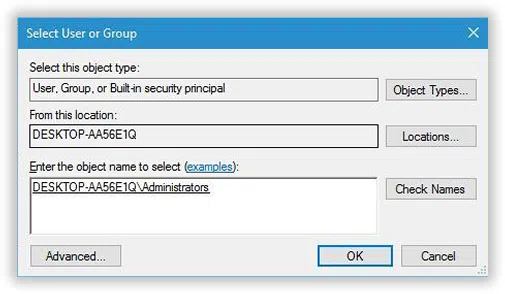
Step 6. Under the "Enter the object name to select" option, input "Administrators" if you are using administrator account, or the local user name. Click on "Check Names" and then "Ok".
Step 7. Now; check the option "Replace owner on subcontainers and objects". Click on "Apply and then "Ok".
Step 8. Once you have followed all these steps, you should be able to enter "Ngc" folder. Delete all the files from the folder.
Step 9. After removing contents of the Ngc folder, add a PIN by following the path: Settings app> Account Settings> Sign-in Options> Add a PIN.
If this procedure does not solve your problem you can follow the next method.
Also read: Forgot Windows 10/8 picture password but remember pin password
Method #2: Utilize I forgot my PIN Option
Sometimes, I forgot my PIN option in account settings forces the system to make the PIN option visible while logging- in. Thus here in this section, we would use this option to set a new PIN code for the system. Simply follow the guidelines below to enable the PIN code feature:
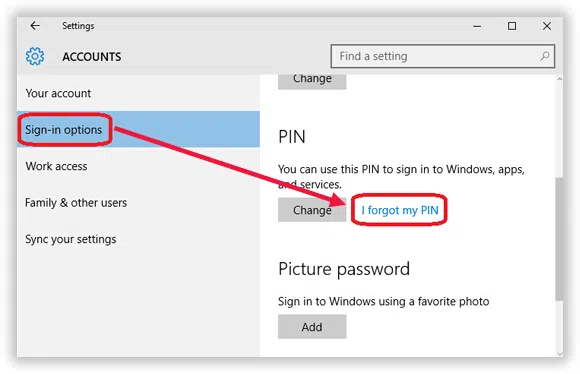
Step 1. Firstly; go to "Settings" and then "Accounts".
Step 2. Now; select the "Sign-in options" and choose "I forgot My PIN" option.
Step 3. Provide all the details required and enter your Microsoft account password.
Step 4. Set a new PIN for the computer and save the changes.
Don't miss: How to Reset Windows 7/8,8.1/10 Password with Ubuntu Live CD/Disk
Method #3: Use System File Checker Tool
System file checker is a program in Windows which permits the users to scan corrupt files and to replace them with cached data. The scanning is done with the help of command prompt and the process takes some time to complete. So don't close the cmd window until the scanning Is finished. Follow the steps to accomplish the task as given below:
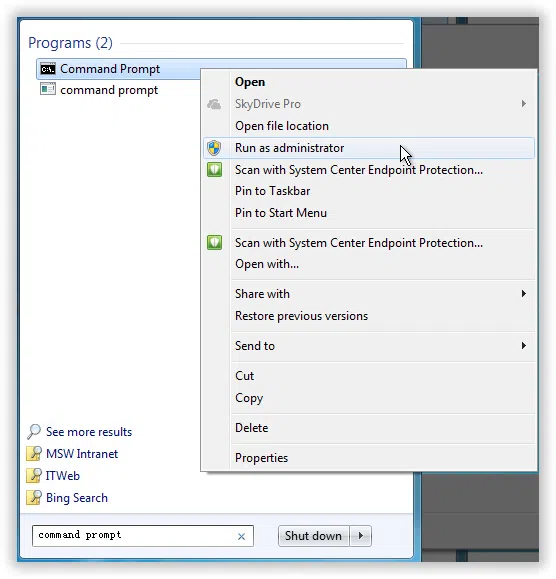
Step 1. Click "Start" button and type "cmd". Right-click "command prompt", select "Run as administrator" to run with admin privileges. If prompted, click "Yes" under UAC pop-up.
Step 2. Type "sfc /scannow" and hit "Enter".
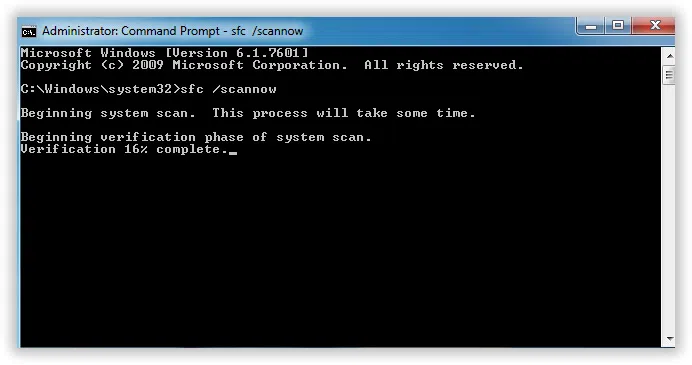
Step 3. It will scan all the corrupt files and would replace them with cached files in a folder %WinDir%\System32\dllcache with ZIP file extension.
Once the corrupt files are replaced, try now to add a PIN and this would not create a problem like before.
Don't miss: How to fix Win + X menu not working issue on Windows 10 ?
Method #4: Use Local Group Policy Editor
Local group Policy Editor contains all the stored policies of your system which can be modified. Thus here also, we would change one of those policies to set a PIN code to sign-in. But, always be cautious while working with Group Policies as a single mistake can render fatal changes to your system. So, this is what you have to do exactly:
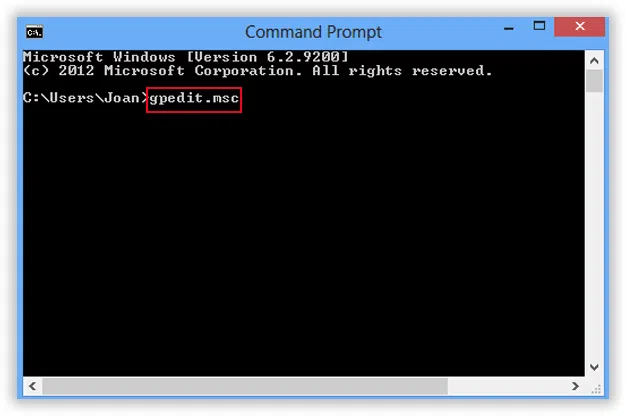
Step 1. Press "Windows key + X".
Step 2. From the results, click on "Command prompt".
Step 3. In the black dialog box, type in gpedit.msc and hit "Enter" to open your "Local Group Policy Editor".
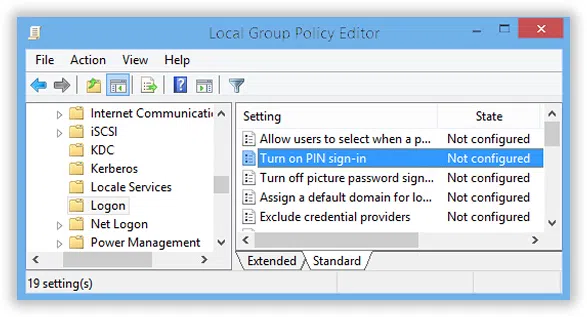
Step 4. Now; double click on "Computer configuration" and then "Administrative Templates" on the left-side of the pane.
Step 5. Double click on "System" and then "Logon" from the sub-menu.
Step 6. Now; on the right-side of the pane, click on "Turn on PIN sign-in" policy and select the "Enabled" option.
This would definitely help you resolve your issue of being unable to add your PIN. But, if the problem still persists, switch over to the next method.
Conclusion
Most of us are used to sign-in to Windows with Microsoft account. But instead of using a long-length password, a PIN is more convenient and easier to remember. But, due to system complexities Windows 10 can't add Pin password all the time. Few system changes just like in case of System File Checker would easily replace the corrupt files and resolve the issue, but the other methods are equally applicable and helpful.