Write protection on USB drives is a virtual lock or rather a physical lock which ensures that nobody extra files can be written or any old files can be deleted. The security measure is good to protect your pen drive contents from irregular visitors or people who tend to sneak into your personal background. But it becomes a headache, when you yourself get the error message while trying to overwrite the pen drive contents "The disk is write protected". May be due to some malfunctioning of the system tools or consoles, the problem has arisen. But you need not worry; few changes in settings, registry key values or property changes can remove the "Read only" write protection.
And the article today here is all about teaching you the methods to do that without involving any annoying third party tool hassle.
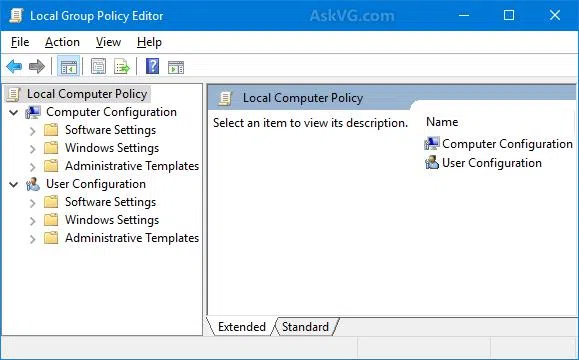
Part 1: Remove Write Protection from Pen Drive using Local Group Policy Editor
Local Group Policy Editors gives you a single user interface through which you can manage the consoles. Now this virtual write lock might have been instigated by any one of the consoles or local group policies. Simply disabling the write access to a particular console can rectify the situation.
Step 1. Use "Windows key and R" together to bring the "Run" search panel.
Step 2. Type "gpedit.msc" command in the search field and click "OK" to open up the local group policy editor operating window.
Step 3. Next go down the following pathway: Computer Configuration> Administrative Template> System> Removal Storage Device.
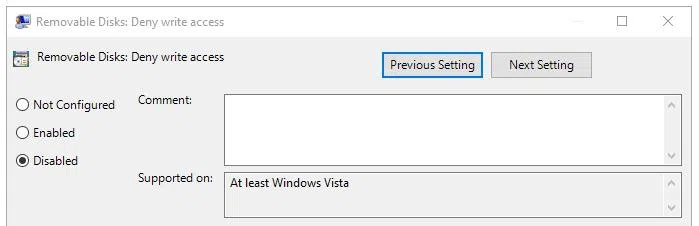
Step 4. Under the "Removal Disks: Deny Write Access" panel, choose "Disable" option and the write restriction will be disabled immediately.
But if the method is still not removing the restriction, try out the next method. It might work.
Also read: How to Fix Windows Taskbar Not Working Issue?
Part 2: Remove Write Restriction from Pen Drive on Windows 10 using Command Prompt
Using command prompt will be a choice you can make to remove write protection from Pen Drive on Windows 10. In case you are not adept using it, better not go for it, but if you are, then we are going to use a certain command called "Diskpart" responsible for managing disk partitions.
Step 1. Open up the "Run" tool.
Step 2. Type "cmd" in the little search box line and hit "Enter" to open the black panel of command line box. You can also open it with admin rights which will give you better handling options. To do that, type "command prompt" in the windows search panel, or Cortana. When the cmd comes to view, right click on it and choose "Run as administrator" from the drop down menu list to run the command lines as an admin which offers you better facilities and features.
Step 3. Now within the dialog box, type "diskpart" and hit "Enter".
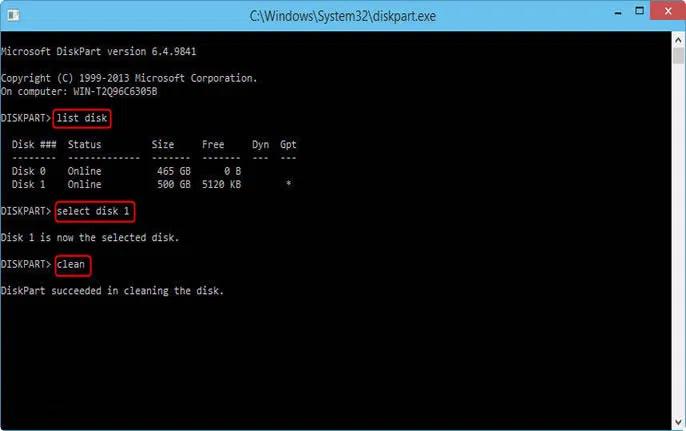
Step 4. Click "YES" to confirm the choice and a new black panel over the previous panel will open up.
Step 5. In the new window, type "list disk" and all the disk partitions will be displayed right away.
Step 6. Choose the disk which shows your write locked pen drive by entering the command "select disk n". Here n is the disk partition number which you can check from the list of disk partitions.
Step 7. Next type "attributes disk clear read-only" command to remove the write restriction. You can check the pen drive for an over-write and you will know if the change has occurred really or not.
You will get a notification "attributes cleared successfully" indicating that the restriction has been cleared successfully.
Don't miss: How to Clean Registry Windows 10?
Conclusion:
All the methods are sure to work in your favor, but in case none of them is working out, then you should either consult an expert or take it the pen drive to a repair shop. The problem could be hard ware oriented. Or if you don’t want to struggle too much, you can simply replace it or purchase a new one and give the older locked device to a repair shop to extract the contents and transfer them to the new pen drive. That way you will get the contents back to a new pen drive and there will be no write protection anymore since the device is brand new.