If you are a pro with video games, and now planning to take one more step ahead to record your active game moves, then this article is a serious platform to offer you the solutions.
Why Do You Need to Record GamePlay on Windows 10?
Many convincing reasons can be ascribed, but the most obvious and silly reason of them is to savor the moment again and again of your gaming activity when you first scored highest, or made a sharp move or drift with your car, etc. Moreover you can create video tutorials with your gaming recordings and share your videos on YouTube channels and social networking sites to promote your gaming skills. You can even submit those videos to online contests to participate in them.
Now the article here will take you through certain manual as well as tool oriented solutions to accomplish the same task of recording your game play on Windows 10.
#1: Record Game Play on Windows 10 PC with Game Bar
Game bar is a pre-configured Windows 10 screen recording tool which is not available for the previous Windows OS versions at all. So if you have got your OS upgraded with Windows OS recently, you are most welcome to try this method in hand. In fact it is quite handy, and fast.
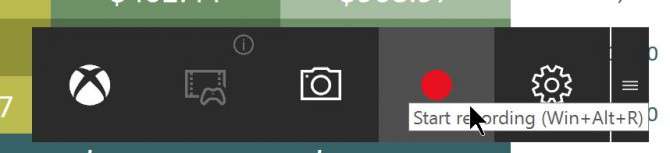
Step 1. Come to your desktop home screen first, and then press “Win key + G” and the game bar pop up appears in an instant.
Step 2. From the small pop up screen asking the question, “Do you want to play Game Bar?” check the checkbox option “Yes, this is a game”.

Step 3. Your Game Bar main interface will come to sight. Click on the red circular icon to start your recording while you are playing the till then paused game in the background.
Step 4. After you have achieved your goal in scoring the highest score, click on the square icon to stop the recording.
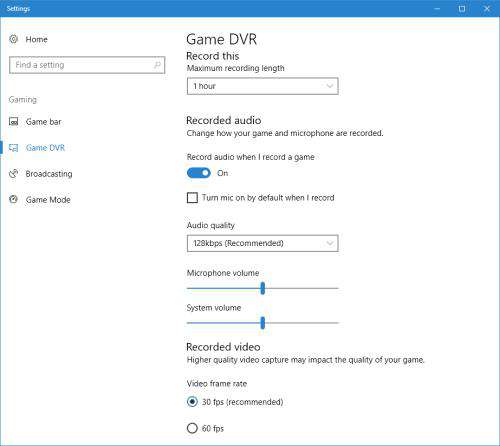
Step 5. If you wish to make certain changes in your recording pattern, go to “General” section, and for advanced settings click “Edit more Preferences in Windows Settings”. Here you can adjust the video and audio formats, resolution, etc as per your requirements.
Step 6. Later on you can check the saved videos within the “Game Bar” section in your Xbox applications.
#2: Record Gameplay on Windows PC using Free Screen Recorder Tool
Free Screen recorder is a freeware tool to record desktop activities, and save it in an appropriate video format. The program saves video files in AVI format, which any computer user can see even with the default media player. It can also be used to record video game activities, and that is what we are going to focus on solely.
Step 1. Download the tool from internet free of cost and install it normally.
Step 2. Launch it and you will get to see the functional window of this tool on screen.
Step 3. Here you can click on the circular icon to start recording while playing your game in the background, and click the square shaped icon to stop the recording.
Step 4. For settings change, you can also click on “Options” and then “General Options” to check out the Settings.
Step 5. You can also select “Video options” and “Audio Options” from the dropping menu to choose quality and length of your recording and many more things according to your need.
#3: Record GamePlay on Windows 10 with ScreenGeeker Tool
TunesBro ScreenGeker is a highly advanced Windows Screen recorder, which is fully equipped to record webcam videos, game play videos, PC tasks, taking screenshots, etc. You can use the tool with Windows XP/ Vista/ 7/ 8/ 10 for both Desktop and Server versions. You can also the Around Arrows option to record the cursor surrounding regions. Besides, you can add your system audio settings or microphone to record your videos alongside for audio incorporation into your recorded video.
Step 1. Download the tool to your computer and make quick installation setup to run the tool.
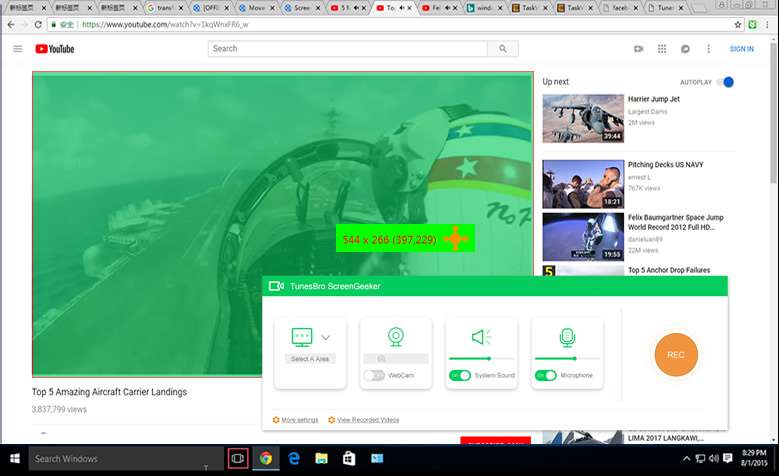
Step 2. When the little rectangular tool box snuggles in, you will see four tool function options along with “REC” option.
Step 3. Click on “Select A Area” and then “Select a recording area” from the menu that slips down. This option will allow you to drag and choose a particular section of the screen where the recording can go on.
Step 4. Click on “REC” button and the recording follow then onwards. You just continue with your gaming zone in the background that you wish to record here.
Step 5. Stop the recording when you are done, and the tool will instantly show you a probing notification “Do you want to save the recorded video?” Simply click “Ok” and you are good to go.
Step 6. The tool will start generating the video before saving it to your computer.
Conclusion:
You can clearly see that TunesBro ScreenGeeker is a much convenient and reliable method compared to the other two methods to record your game play on a Windows PC. If your computer RAM is more 4 GB you can rely on Game bar feature as well since it demands heavy underlying system requirements. But if not, then stick to ScreenGeeker for the good.


