Now, ISO files are not like any normal files where you can select and press the 'Delete' button to make it disappear. No, that's not how you add or delete files from ISO images. Rather it takes you to go through a series of steps and third party software to accomplish it. To be honest, Windows doesn't have any default software that enables a user to add or remove files from ISO images however; we can take assistance from third party software. That's where iSeePassword WizISO comes in handy.
In this article, we will talk about how to add files into existing ISO image files and if you wish to remove any files from it then how to accomplish. Assuming you do have an ISO image file with you, whether it's Windows operating system or any other software or application, many times we wish to add other files into it or we may want to remove some unwanted files from them.
- Part 1. Tools We'll Use
- Part 2. How to Add An File, Folder to ISO Image
- Part 3. How to Rename or Delete An File, Folder from ISO Image
Tools We'll Use
1) A complete ISO image
2) A working computer
3) WizISO - an all-in-one ISO Editor software.
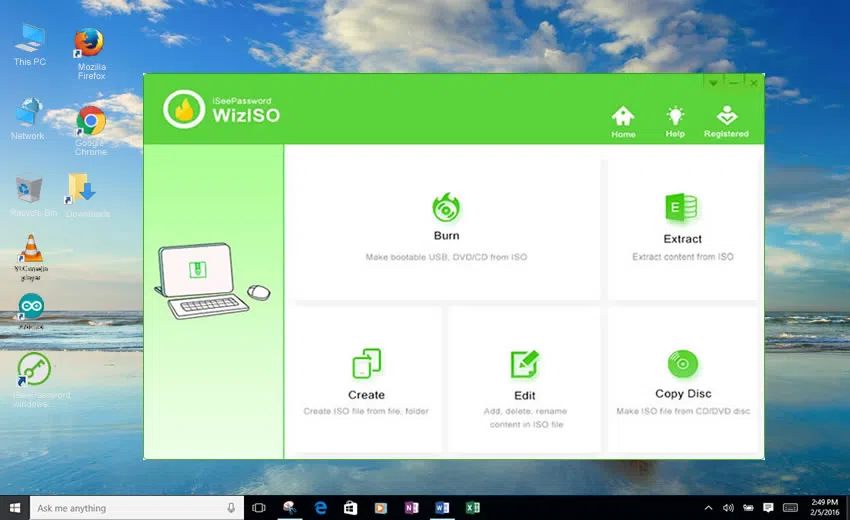
WizISO is the World's best and number #1 ISO editing tool that assists you to create, burn, extract and modify ISO image files without damaging any existing data. It operates very quickly and needless to mention that it also helps to burn Windows operating systems into writable discs within minutes.
Key Features:
- All-in-one solution: Burn, create, copy, extract and modify.
- Burn ISO images into both CD/DVD and USD disks.
- Adding, editing, renaming and exporting have never been easier with this tool.
- Copy all the content from ISO images to personal computer.
- It is reliable, completely secured from unnecessary malware and spyware infiltration.
Part 1. How to Add An File, Folder to ISO Image
Adding files or folder into ISO images is not similar to copying files into a folder. Once ISO images are compressed, they will be unable to add new files whatsoever and that’s why we do require WinISO tool to accomplish this task.
Step 1. Download and Install WinISO in your Mac or Windows computer and run the program as an administrator. You will be offered 5 options to choose from on the main user interface. Click on "Edit" and go to the next step.
Step 2. On the menu bar, you will be given the option to add, edit, delete or rename the ISO image file. But you need to first import your ISO image to the program. Just click "Load ISO" button to import ISO file and the ISO image will be spread out.
In order to add files, just click on "Add" and locate the files from your PC to add them successfully.
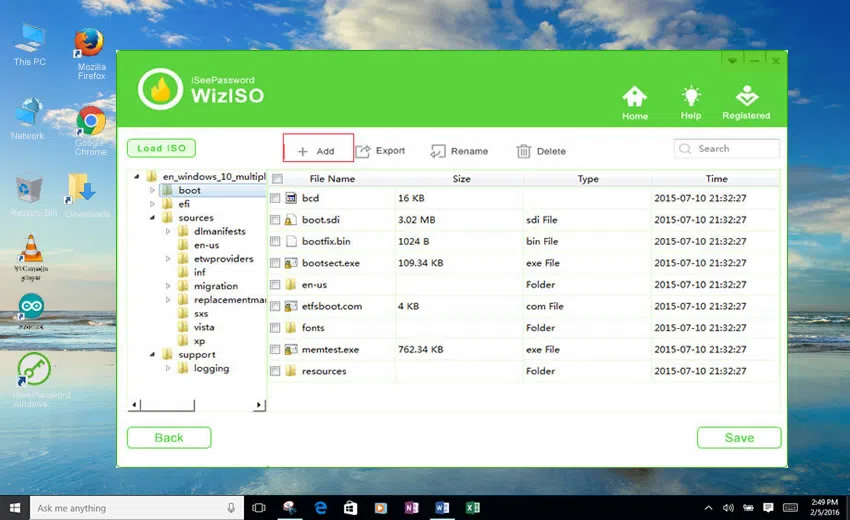
That’s all, then click on "Save" and your new ISO image file will be created successfully. You can name the volume label as per your requirement and within minutes your ISO image will be ready.
Also read: How to Burn ISO Image to Bootable USB Drive on Windows 7/8/10
How to Rename or Delete An File, Folder from ISO Image
Step 1. In order to delete files, simply click on the files that you wish to remove and click the "Delete" button. It support picking multiple files or folders. Then click "Save" button to create a new ISO image with your changes.
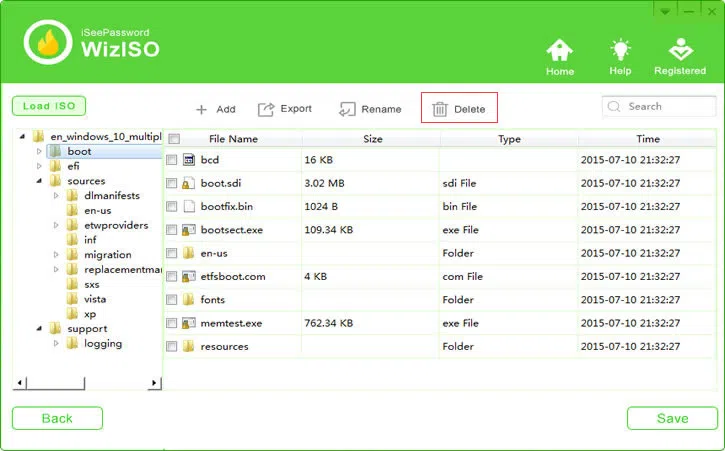
Besides of "delete" feature, the program also allow users to extract, rename the files, folders from ISO image, means you can extract all content from ISO image to your computer.
As you know, there is no a straight-forward procedure to edit a bootable Windows ISO image, but WizISO program could help you add files, folder to an ISO image without damaging the current MBR, the re-created ISO will still be bootable and workable.