
There are times when you need to capture the screen activity on your Windows desktop for tutorial and presentation purposes, for instance playing games, creating designs, working on applications like Microsoft PowerPoint, giving tutorials to students on a particular subject, etc. Besides capturing screenshots which are provided by Microsoft through in-built tools like Snipping Tool, the need for recording screen actions are equally important as it provides more active gestures to understand things with much more clarity.
There are many online tools available and certain in-built programs pre-installed within the operating system to help you record your videos. Most of the users are not completely aware of these in-built features and online apps but this article will explain everything with broader description and screenshots.
Method #1: Record Videos on Windows 10 Using Video Recording
Windows 10 operating system is really a breakthrough in the history of all the Windows operating system, but mostly they are hidden and the user has to explore deep into its software hub to unleash them. One of those hidden feature is the utility which can record literally videos of any screen activity you perform, whether you are typing, playing games, editing, painting, etc. Since it’s an in-built feature, there are no extra editing provisions available, yet it is enough to capture quick, small size videos for small scale requirements. The recording utility is a part of the Xbox tool which is pre-installed by default in windows 10. The steps to use the utility are elaborated below in the following steps:
- Step 1. Open any application that you want to record. Though the tool cannot capture videos of the File Manager, or the complete desktop, but it can capture videos of regular apps.
- Step 2. Press “Windows + G” from the keyboard to open the Game Bar dialog.
- Step 3. Check the “Yes, this is game” checkbox to deceive the application on what you are going to record.

- Step 4. Now; click on Start Recording button or simply press the key combination “Windows + Alt + R” to start the recording.

- Step 5. When you are done with the recording and now would like to stop, click on the red recoding bar at the top right corner of the program windows.
NOTE: If the red recording bar disappears, press “Windows + G” to bring it back on the windows screen.
And that’s it! You can now go to File Explorer and under the location This PC Videos Captures. But the quickest way to find out the captured videos is to locate in the Xbox app itself, in the Game DVR section.
Method #2: Record Videos on Windows 10 using ScreenGeeker
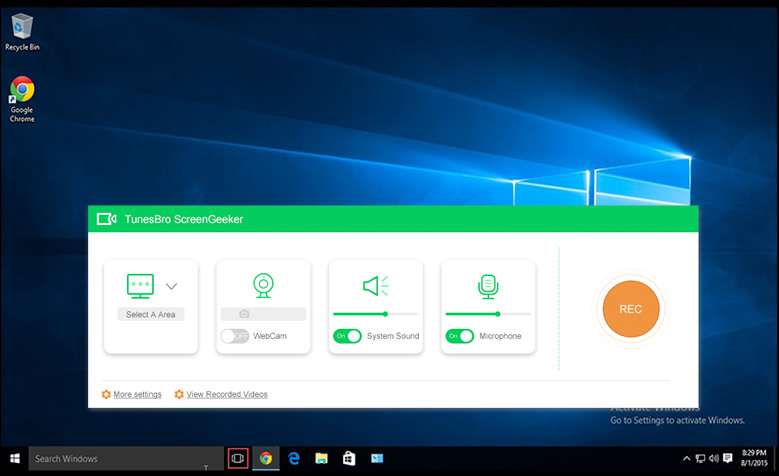
Tunesbro ScreenGeeker is a powerful yet free screen recording software which allows users to record the computer screen, online video or game to generate high-resolution videos without any watermark. It offers 4 options to capture a specific area or the full screen. Before recording, you’re allowed to add logos, titles, change mouse color, and other meta-info to your video. This program claims itself as free, simple and the file size of the video it generated will be smaller then other paid software!
Step 1. Firstly, download and install the ScreenGeeker on your Windows computer, and launch it. You can see it has a clear interface and pretty good functionality, there are 4 options in the main interface like: select an area, webcam, system sound and Microphone. You can turn on them if necessary.
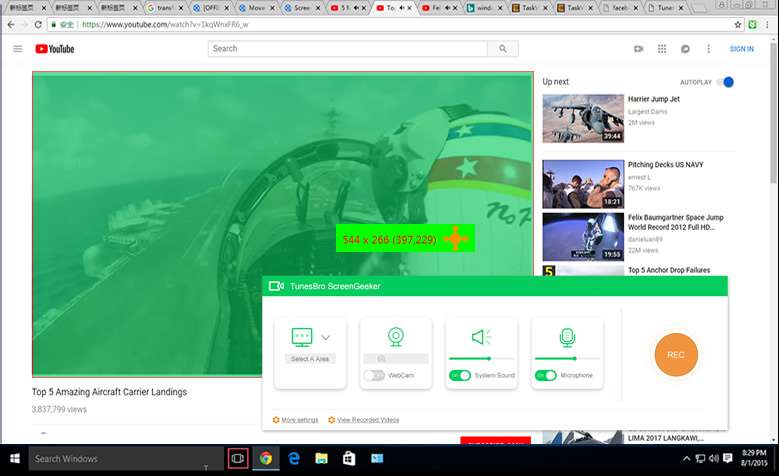
Step 2. Let’s drag a recording area! Click the option 1 “Select a area”, you will see there are 4 models for you choosing. You can record the full screen, or drag a area! In fact,you can click More settings option to set the shortcut key, logo, title.

Step 3. Let’s try to record on YouTube video now! I suppose that you’ve watching a YouTube video, then open the program and drag an area for your video, then click REC button.
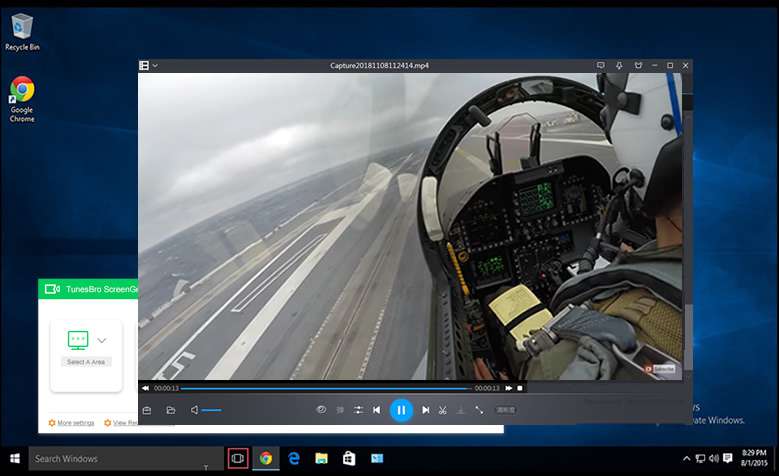
Step 4. When click “Stop” button or use the shortcut key , it will ask if you want to save or not, click “Yes” button to create a HD video for your recording. Then a video list will open and list all the video you’ve recorded. Directly click it and watch it!
it’s totally free!!! Not simply it can capture videos on your computer, but also it allows you to take screenshot, and audio recording!

Method #2: Record Videos on Windows using Camtasia Tool
Camtasia is a wonderful and popular tool which is primarily used for capturing Windows screen videos. It is incorporated with various editing features which were not present in the previously mentioned in-built utility. Thus it is far better option to choose if you wish to record a high quality video loaded with many features for its editing. The steps to use the tool are laid out as follows:

- Step 1. Download the program and install it properly so that you can see its icon on the Desktop screen.
- Step 2. Launch the Camtasia Studio 8 tool by clicking it’s icon from the desktop.
- Step 3. Once the main interface screen turns up, locate the “Record the screen” option at the top left corner of the screen below the “Edit” option.
- Step 4. Once you click the “Record the screen” button, a control panel would open up.
- Step 5. Choose your recording area. If you are going to switch between multiple windows, then it would be better to select the entire desktop area. Anyway the full screen recording privilege is provided by default.
- Step 6. Choose your audio input by clicking the down arrow next to the “Audio” button to select the microphone connected and choose your video input by turning on the “Webcam” option.
- Step 7. Now before you commence with the recording process, open all the windows that you are going to use during your recording and make them ready prior to the recording.
- Step 8. Click “rec” button to commence the recording. A countdown will emerge, and after it disappears whatsoever activity you do on the screen will be recorded as a video.
- Step 9. Once you are done capturing your video, press F10 to stop the recording.
Cons: This is quite a professional video recording software with the video editing feature. I don’t recommend if you’re a newbie.
Conclusion:
It is quite an interesting leap where you can actually record what you are doing, which provides you an opportunity to exhibit many of the things that you do to others with small video clips. This can be used as a presentation in meetings, gatherings. But you need to have a thorough idea about the measures and tools that can accomplish the task. The two methods mentioned above in the article are very effective to record a video on Windows 10 computer. Just follow the steps and it will all be done securely and perfectly.


