
If you have ever used Raspberry Pi in any of your projects, you should be familiar with what an IMG file is. IMG is a type of file format that represents images of various types, these may include Operating Systems, software, or even entire hard drives. It has a .img file extension, that’s how you can identify an IMG file.
However, it is not as popular as other image file formats like DMG or ISO, so, if you want to create a bootable USB with the help of an IMG file on a Windows 10 PC, then you are in real trouble. Not only will you not find enough documentation on how to burn IMG to USB on Windows 10, but you’ll hardly find any software that does that. Which is why we thought of writing this article so that if you are facing a similar issue, you know how to solve it.
There are 2 main software using which you can burn IMG to USB on Windows 10; Win32 Disk Imager and Rufus. Here’s how they work:
Burn IMG to USB using Win32 Disk Imager
This is a free utility that supports all major release of Windows including Windows 10. It is pretty simple to use. However, it has some major bugs in it that have not been addressed yet. For example, if you are using Ramdisk, you’ll not be able to use Win32 Disk Imager as it will crash. Also, since it is a freeware, it does not have any dedicated support team. So, if you come across any new bug then you are on your own. Moreover, it only supports Windows OS, so you are out of luck in case you switch to Linux or Mac. Here’s how you can use it to burn IMG to USB on Windows 10:
1. Head over to the Win32 Disk Imager website. (https://win32diskimager.download/download-win32-disk-imager/), and download the ZIP file on your Windows 10 PC.
2. Unzip the file on your desktop.
3. Press the Install button to start the installation. Once the installation is complete, press Finish to launch the tool.
4. From here on, its pretty simple. Select the IMG file using the browse button under the Image File section. Then, select the USB drive from the dropdown in the Device section. Once done, simply press the Write button, that’s all!
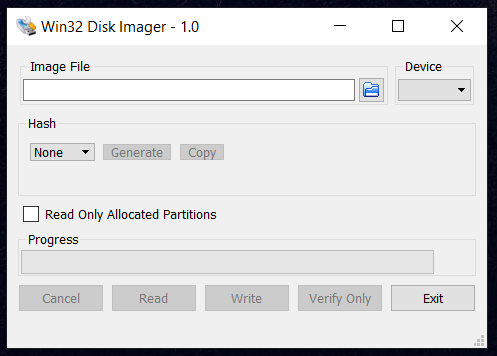
5. Once the process completes, you’ll get a message saying so after which you can take out the USB from the drive, and exit this tool.
Burn IMG to USB using Rufus
Rufus is a well-known program for creating bootable drives or operating system installers. It has a number of advantages over Win32 Disk Imager. It supports various file formats other than just IMG files; these includes ISO,img and BIN etc. This utility is just over 1MB in size and work faster than other similar software like the Windows 7 USB utility, Universal USB Installer, and UNetbootin.
Step 1. Download and install Rufus on your computer, (https://rufus.ie/en/), then launch the Rufus and connect your USB drive to your computer.
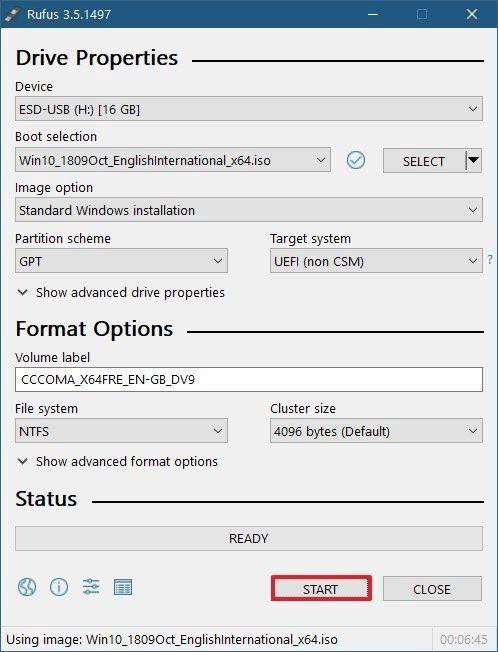
Step 2. Your USB drive will be showed in the list, then click Click on Device and choose the USB you want to use from the drop-down menu.
Step 3. In the Boot Selection option, select Disk or ISO image then click Select. Rufus will open a new window and ask you to import your ISO image.
Step 4. The Rufus will gives you the most suitable Partition Scheme based on your device, of course you can change these settings if you want.
Step 5. Set a name for Volume label that should be easy to recognize. or leave it as it is, and also leave the default settings for File system and Cluster size. Now click Start.
Step 6. A warning window will pop up saying that your USB drive will be formatted, take easy, this is normal, please back up your important data if there are any.
Step 7. Once the Rufus completes the process of creating ISO image from your USB, eject your USB and your bootable USB is ready to go.
Both of these tools will let you burn IMG to USB on Windows 10. However, if you ask me, I would recommend using Rufus since it does more than just burn IMG to USB, also, you know where to get help if you need some.


