For those who don't know, DMG files are mountable disk image files for Mac OS, just like ISO files of Windows OS. DMG files are generally found to be compressed and encrypted. Since it is Mac OS compatible, so it is easier to burn it to USB using a Mac platform. In fact, you can do that with in-built utilities. But when you are about to use it on a Windows system, you would need extra help of either offline third-party tools or online tools to do the job.
In this article, we will show you 5 ways to burn DMG files to USB using both Windows and Mac OS platform.
Part 1. Burn DMG to USB on MAC
This method may vary depending on which Mac OS version you are currently running, but the overall concept is same for all. The in-built disk utility on Mac is ideal for burning DMG to USB. Once the DMG is burnt, the USB drive, now bootable can be used as an installer on any other mac System.
Step 1. Navigate to the following pathway: Application>> Utilities>> Disk Utility.
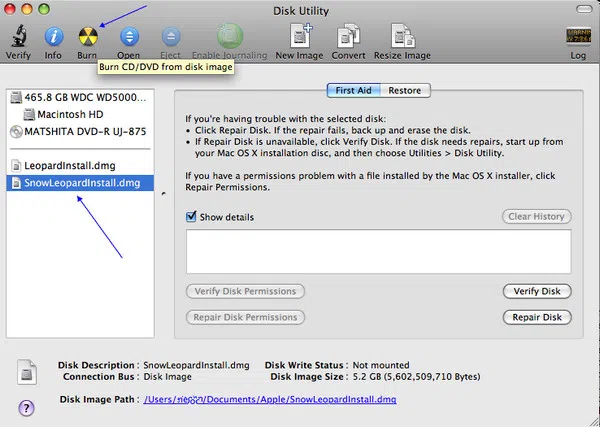
Step 2. Click on the Disk Utility option to run it.
Step 3. Insert your USB drive and check if it appears on the left side of the Disk Utility operating Window. It means the drive is recognized by the system.
Step 4. Now open a Finder Window and browse to locate your DMG file. Drag the file to the Disk Utility Window.
Step 5. Now specifically select the file by clicking on it, and then click on "Burn" option from the same Window.
A pop-up will appear, select the USB drive as your destination drive and click "Burn" again to proceed. The process will take some time depending on the MAC os version you are using. Once done, take out the USB for later use.
Part 2. Convert DMG to ISO First then Burn to USB
In this approach, we will perform the task on Windows platform. To do this, we would first convert the DMG to ISO file format, since this is the file format Windows fully support. Then use any free ISO burners to burn ISO file into your USB drive. You can do this task using certain online converter as well. But we would use command prompt (command line interpreter of Windows OS) to do the job.
Step 1. Make sure you have the DMG file ready in your computer.
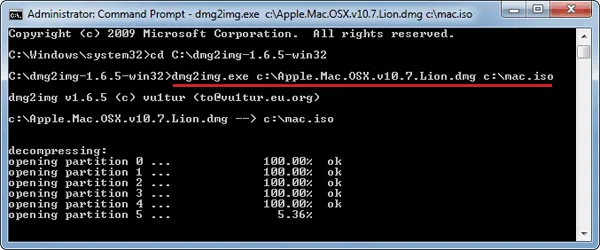
Step 2. Press "Windows + R" to get the "Run" dialogue box. Type "cmd" and hit "Enter" to get the black command prompt dialogue box.
Step 3. On the black screen of cmd, type the following syntax and hit "Enter": dmg2img.exe {source file.dmg} {destination file.iso} .
For instance, dmg2img.exe c:\Apple.Mac.OSX.v10.7.Lion.dmg c:\mac.iso. The processing will take some time. After that, the DMG will be converted to ISO.
Step 4. Finally, you can use any freeware ISO burners, like PowerISO, ISO editor, Free ISO burner to burn the ISO file to your blank USB drive.
Part 3. Burn DMG to USB on Windows using UltraDMG
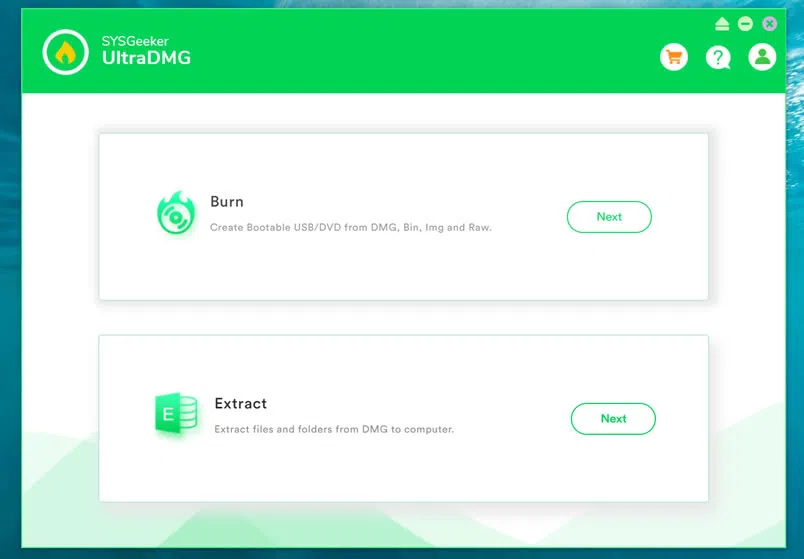
UltraDMG is a great tool that can seamlessly write DMG file to USB drive with the booting information and make it bootable. It's a fast and effective way to create a macos bootable installation drive. Apart of the DMG burning option, it also provides "Extract" option which allows you to extract any files and folders from DMG file to computer. In the aspect of software usability , for those users who are not particularly tech-savvy, WonderISO has eliminated the hassle of performing lengthy and confusing steps. This is a third-party tool which can do the job both on Windows and Mac OS. It can not only burn DMG files to USB, but it can burn various other files formats like ISO, RAW, IMG, ZIP, BZ2, etc. It supports multiple disk image burning at the same time, which is quite unusual. Regular software updates are available from time to time. For your queries, professional team for customer support is available.
Step 1. Download the tool for sure from its official website to get the authentic one. Install it with on screen guidelines. Run it by clicking "Run as administrator" from the right-click sub menu. On the first screen, you will be presented with two options to choose: Burn and Extract. Click on "Burn" option.
Step 2. In this screen, Insert your USB to any free USB port and wait till the device is recognized.
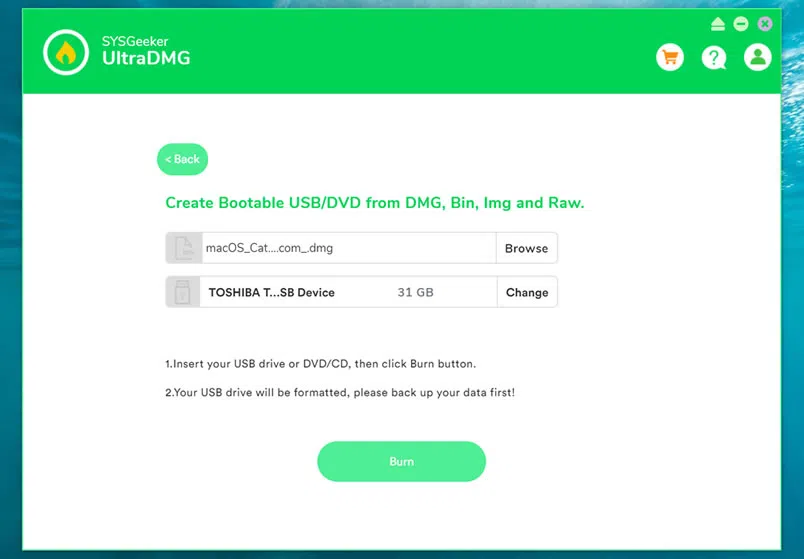
Step 4. A new Window will pop-up. Here browse to select your DMG file from the computer directory, mention the USB drive to store the burnt image, and finally click "Burn" option to start the process. The progress can be seen by a progress bar.
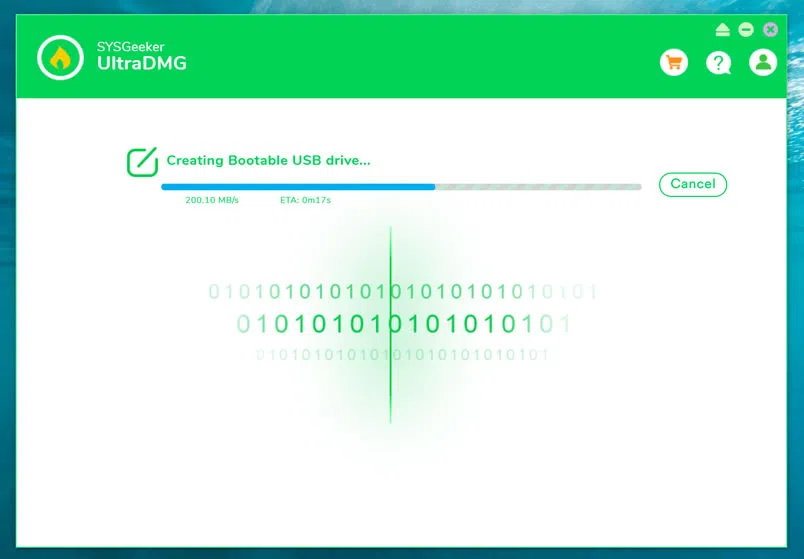
When it is done, take out the USB drive and insert your Mac computer. You can boot your Macbook from this USB drive by clicking the option button during bootup and select this USB drive.
Part 4. Burn DMG to USB on Windows using PowerISO
PowerISO is another third party tool which can burn Mac os DMG to USB drive on Windows 10. It can compress, edit, burn DMG files apart from ISO files. You just have to make certain changes to the tool's default settings to bring about the change. Apart of DMG file, it's also a great tool to process ISO image, CD/DVD burning and other process.Make an image and modify the preferences your ISO is prepared to use.
Step 1. Download the tool from any free software distributing sites to the computer which stores the DMG file.
Step 2. Insert your USB drive to any free USB port. From the tool main interface, click on "Tools", and then "Burn" option.
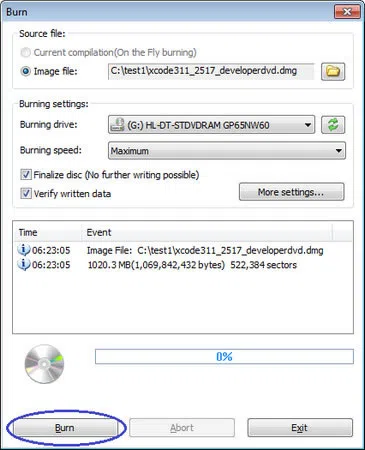
Step 3. When a new operating Windows turns up, set the burning speed to a optimum value that your hardware can handle. Click on "Burn" once more to initiate the burning process.
The third method is recommended if you don't have much experience with command prompts and ISO burners. It is an easier and direct approach. You don't even have to get an additional ISO burner to do the job, since it is in-built. So UUByte DMG Editor appeals to novices or beginners.