When the boot sector in Windows is missing or damaged, you get this error message - "BooTMGR is Missing". Sometimes, a simple fix, such as restarting your computer takes care of the problem. However, at certain times, you may need more complex solutions. Here are the ways to fix this issue for your Windows 7.
Note: In order to use these solutions you will need the Windows 7 Installation disc. This article mainly take Windows 7 as an example to explain how to fix, it also work for Windows 8, 8.1 and Windows 10.
Part 1: Startup Repar Using WinRe (Windows Recovery Environment)
Here are the steps to repair the error using this method:
Step 1. Insert the disc for Windows Installation and boot up your computer.
Step 2. You will see the message "Press any key to boot from CD or DVD" – press any key as it says; if you do not get this message, you will need to change the BIOS setup to enable priority booting from a CD or DVD
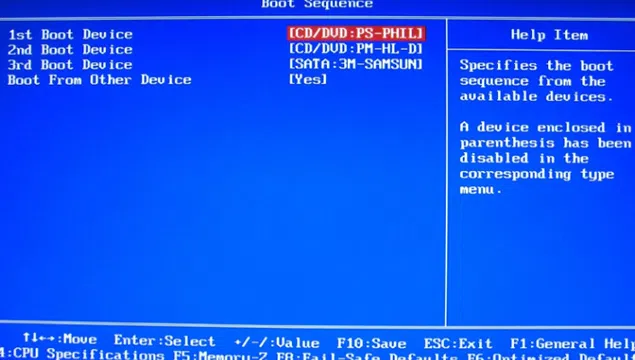
Step 3. In order to change the boot settings, you will need to watch the first screen that appears while starting or restarting your computer. It will tell you which key you need to press to enter the BIOS setup by interrupting the normal start-up. Most of the computers use the DEL, F10, or ESC key to enter the setup. (Click here if forgot BIOS password)
Step 4. Once you are there, look for the Boot options in one of the tabs. Usually the tabs are labelled as Boot, Boot Options, or Boot Order. Remember that the mouse will not work on this screen and hence you will need to use the arrow keys for navigation.
Step 5. Locate the section which reads "Removable Device" (most PCs will show this label). If this label is not there, look for something that says CD/DVD or USB Flash. The drive that you wish to prioritize for boot should be moved up the list. So, do this for the CD/DVD.
Step 6. Save the changes and exit. The computer will restart and will boot using the CD/DVD you inserted in the disc drive.
Step 7. On the next screen, you will need to choose time, currency, language, and the input method. Click on Next after making the choices.
Step 8. Now click on 'Repair your computer'.
Step 9. You will now see the dialog box labelled, 'System Recovery Options'. Select the drive you have inserted for the installation. Now you will need to click on Next.
Step 10. You will again see the option 'Repair your computer', click on it.
Step 11. You will now be asked to choose the Windows OS version you wish to repair; choose your version of Windows 7. Click "Startup Repair" on the next dialog box that appears.
Must read: If you're locked of Windows 7 and can't access to system, don't worry. Windows 7 Password reset solution should be considered firstly because it can easily access your laptop without system re-installation and data loss.
Part 2. Using WinRE to Rebuild BCD (Boot Configuration Data)
Step 1. Insert the Windows Installation CD/DVD into the drive and restart your Windows 7 PC
Step 2. You will see the message "Press any key to boot from CD or DVD", press any key as it says; if you do not get this message, follow the steps outlined above to enable priority booting from a CD/DVD or USB flash drive. For this purpose you will need to change the BIOS setup.
Step 3. On the next screen, you will need to choose time, currency, language, and the input method. Click on Next after making the choices.
Step 4. In order to begin the repair, you will need to click on 'Repair your computer' on the next screen that will appear.
Step 5. It will ask you to choose the Windows OS you wish to repair. Choose the Windows 7 version you have installed on your computer.
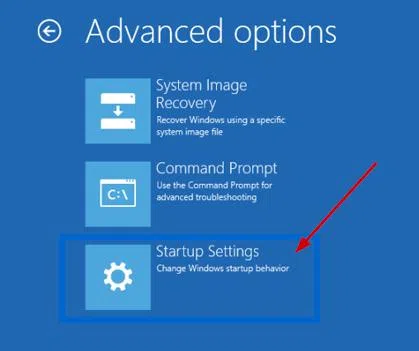
Step 6. You will see the 'Command Prompt' option in the 'System Recovery Options', click on Command Prompt.
Step 7. The Command Prompt will now appear; now you will need to type Bootrec /RebuildBcd. Press Enter after typing this command.
Also read: How to Reset Windows 7/8,8.1/10 Password with Ubuntu Live CD/Disk
SOLUTION 3: USING THE SYSTEM RESTORE
The System Restore must be enabled on your computer in order to use this method.
Steps:
1) Insert the Windows Installation CD/DVD into the drive and restart your Windows 7 PC.
2) You will see the message 'Press any key to boot from CD or DVD' – press any key as it says; if you do not get this message, follow the steps outlined in SOLUTION1 to enable priority booting from a CD/DVD or flash drive. For this purpose you will need to change the BIOS setup.
3) On the next screen, you will need to choose time, currency, language, and the input method. Click on Next after making the choices.
4) In order to begin the repair, you will need to click on 'Repair your computer' on the next screen that will appear.
5) It will ask you to choose the Windows OS you wish to repair. Choose the Windows 7 version you have installed on your computer and click Next.
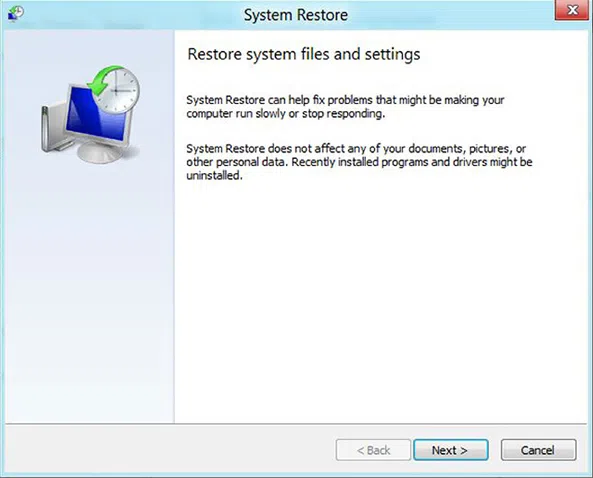
6) Now click on 'System Restore' in the dialog box labelled System Recovery Options.
7) Choose the desired restore point in the System Restore Wizard, click on the Finish button and your system will be restored.
When we boot our computer and "BOOTMGR is missing" error may appear when attempting to boot into Windows, then Windows fails to load. if you experienced the issue "bootmgr is missing on Windows 7 ", this article may help you a lot.