
Hello guys, today we would discuss one of the most frequently asked topic for those who are new to the usage of Mac OS that is, how to show and hide the hidden files in Mac OS X? Before we commence with the stupefying elaboration of WHAT TO DO? Let’s have a brief discussion on the aspect of this hidden folders and files in Mac OS X.
Actually by default, Mac OS prefers to hide confidential files and folders away from users. In case they delete or change any of those essential files mistakenly, then it would bring about serious changes to the system’s operating system which may turn out to be disastrous on many cases. Hence , here in this article we would discuss 2 mighty methods which are basically based on running certain commands, one via long way, and another using short cut aliases which are outlines below.
Don’t miss: 3 ways to reset Mac login password without install disk
Part #1: To Show Hidden Files on Mac using Terminal Command
Similar to the command prompt, Terminal is also a command line interpreter, which provides an interface to control the UNIX-based operating system which is in this case, is Mac OS X. Usually we deploy a bit lengthy commands in this interface to carry out the necessary modifications to show/ hide files. Go through the steps outlined below for the following method:
Step 1. Click on “Finder” from the upper left corner of the home screen, and select “Applications” folder.
Step 2. Click on “Utilities” folder and open “Terminal”.
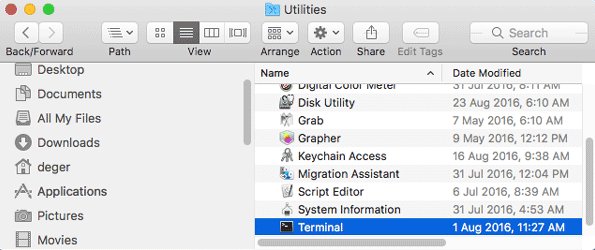
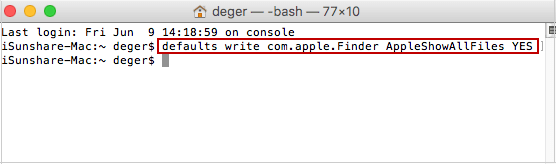
Step 3. Once the Terminal dialog box turns up, input the following command and then press “Return” key:
defaults write com.apple.finder AppleShowAllFiles YES
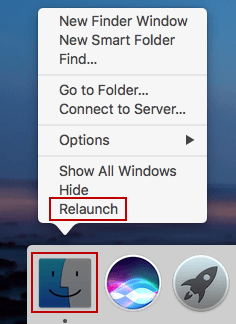
Step 4. Now; hold the “Option or Alt” key, and simultaneously right-click on the “Finder” icon in the upper left corner of the screen. Click on “Relaunch” from the drop down menu.
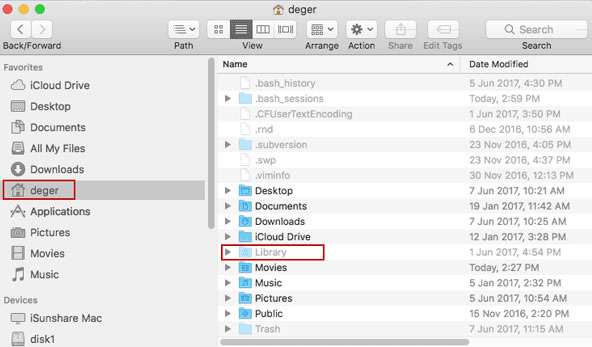
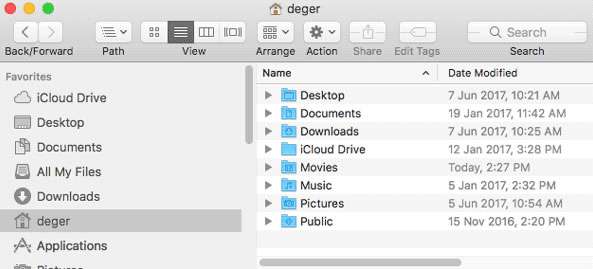
Step 5. Once you are done with this much, you can go to user deger and you will be shown all the hidden folders of the Mac OS X.
Also read: 2 Ways to Boot Your Mac in Safe Mode
Part #2: Hide Hidden Files on Mac using Terminal Command
If you wish to hide the files once again to their restricted locations, simply follow the steps from 1-5 and replace the previously entered command with the following new command in the Terminal dialog box:
defaults write com.apple.finder AppleShowAllFiles NO

You should see the hidden files/folders are not shown.
If you’re using Windows 10, it also easy to show and hide file/folders on Windows 10
Part #3: Show/ Hide Hidden Files on Mac/ Using Terminal Aliases
As per the instructions of the aforementioned method, you need to enter the commands every time you wish to show or hide the hidden security files which at times prove to be a bit hectic. Since you cannot memorize the entire code, you have to retrieve it every now and then to do your job.
Now Alias is a shortcut command for a single or multiple commands designed to render the same changes as the long commands, with an exception of cutting short your valuable time.
Step 1. From the “Finder” context menu, select “Applications” folder, and then “Utilities” folder. Inside the “Utilities” folder, you get to see “Terminal” option. Click on it to launch the “Terminal” feature.
Step 2. From the Terminal interface, type in the following command:
sudo nano ~/.bash_profile
Step 3. Enter you Mac’s admin password if required and press “Enter”.
Step 4. Now; at the bottom of the opened .bash_profile file, paste the following command:
alias showFiles=’defaults write com.apple.finder AppleShowAllFiles YES; killall Finder /System/Library/CoreServices/Finder.app’
Step 7. Just below the recent command, enter this additional command also:
alias hideFiles=’defaults write com.apple.finder AppleShowAllFiles NO; killall Finder /System/Library/CoreServices/Finder.app’
Step 8. Press “Ctrl+O” key combination and hit “Enter” to save the file which is currently modified.
Step 9. Now; press “Ctrl+X” key combination to close the particular file and return to the Terminal command line dialog box again.
Step 10. In Terminal dialog box, type in the following command for it would make your alias available by refreshing your profile:
source ~/.bash_profile
Step 11. Now; if you want to make the hidden files available enter in Terminal showFiles and then hideFiles when you want to make them unavailable again.
Conclusion:
As you can see, the methods mentioned above mainly involve running commands, and thus following the 1st method often proves to be a bit time consuming, but creating the Terminal Alias would save you the trouble of cramming all the lengthy commands. To be enable to hide/ show hidden files/folder on Mac is of utmost importance if you are going to use your Mac OS X on a daily basis.
Related Articles:


