Though iPhone is treated as a never go the wrong device, you may see some issues bothering you as you keep using it. One such major problem faced by the iPhones users is the iTunes that keep on asking you to enter your Apple ID over and again. Current article attempts to provide a fix to this problem.
What Causes This Issue?
This issue happens after an update, or in cases where you have restored your device. If it happens with no such possibilities, it could be a case of failed downloads. It could also have something to do with your account settings. If you forgot iTunes backup password, check this article to help you unlock iTunes backup without factory restore.
Having seen why this happens, let us now try to fix this issue.
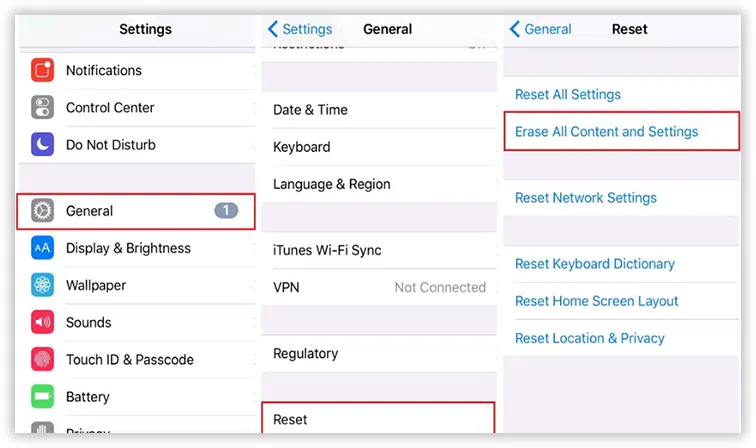
Solution 1: Try to Reset Settings on Your iDevice
You can attempt resetting the settings on your iPhone. If the settings have gone haywire, resetting them can fix the issue.Go to Settings -> General -> Reset -> Reset settings. Wait till the process finishes. Your data will not get deleted through this option.
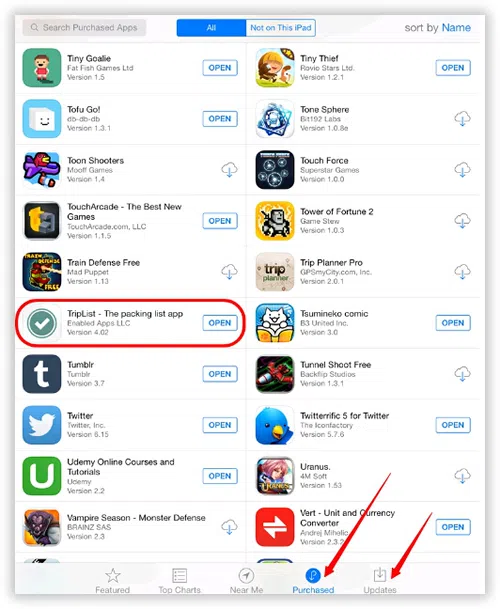
Solution 2: Try to Check Updates And Purchased Apps
If the method above fails, launch your App store and check for the apps that have updates pending. Also, check the Purchased Apps section. It could have one or more apps that have failed to update or download. You will not find the failed downloads on your home screen. This step is the only way to check the failed downloads.
Go to your iTunes account settings and log out of your account and then log in again. You can do this by going to Settings ->iTunes. If you are unable to re-log in, try resetting your password using a PC.
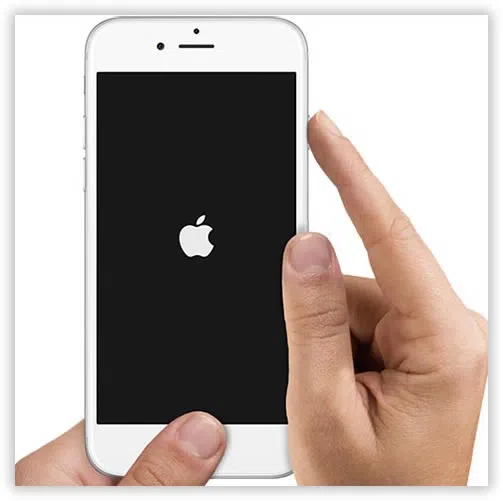
Solution 3: Try to Reboot Your iPhone
This method is ideally the first solution that could work for you in most cases. Not only this issue but most of the other problems can be solved rebooting your device.
Press the "Home" and sleep/wake button simultaneously. This step will reboot your iPhone.
Solution 4: Try to Check iCloud/iMessage/FaceTime
Check whether your iCloud account has configured correctly. You may consider deleting your account and thus turning off iCloud, ensure you have taken a backup on iTunes and iCloud before deleting the account. You may also try to go into Settings -> iCloud and then the accounting field.
1) Erase the password and retype it.
2) Click on Done and check if the issue gets resolved.
Do the same with your iMessage and FaceTime services. These services may have some activation problems.
Try turning them off and check if the issue may get solved, you can turn them ON with the correct Apple ID.
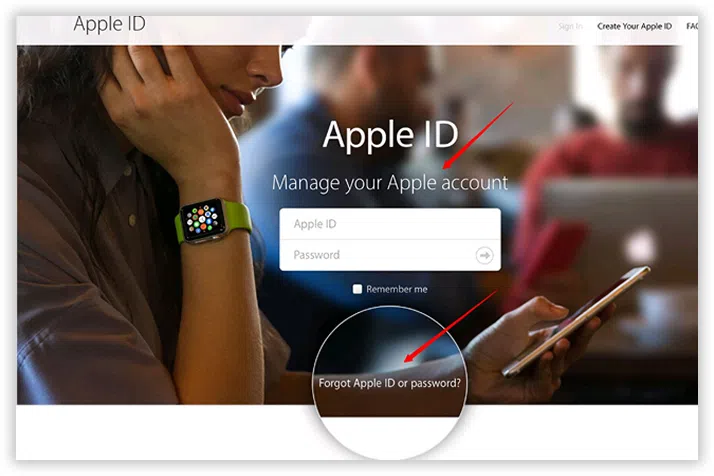
Solution 5: Try to Change Your Apple ID
Changing your Apple ID can sometimes sort out the issue at times. To do this
1) Go to Settings -> iCloud.
2) Scroll down and choose Sign Out.
3) Go to My Apple ID by going to https://appleid.apple.com and click on Manage Your Apple ID.
4) Change your Apple ID to the Email ID address. Check if this issue solves the problem.
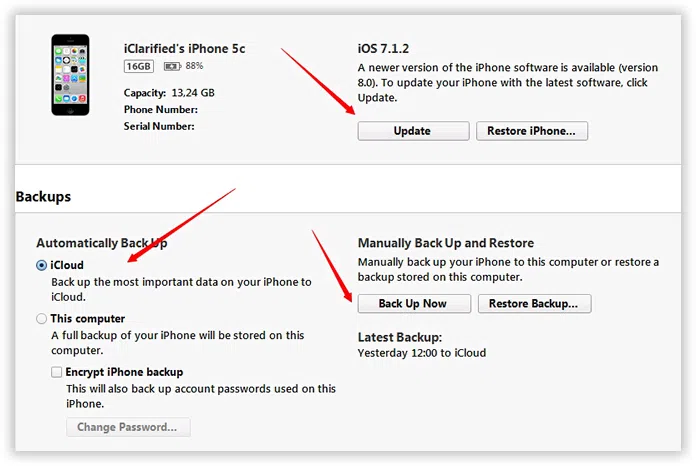
Solution 6: Update Your iPhone to the Latest Version
Check if your device has any software updates pending.
1) Update it to the latest software available to you.
2) Back up your device before updating it. Go to Settings ->General -> Software Update.
3) Once you have updated it, sign out of iCloud and restore the backup.
4) Once the restore is complete, sign in back to iCloud.
Solution 7: Try to Restore Your iPhone Completely
If all the above options fail, you will be left with only one way to resolve the issue, i.e., resetting your device. A clean restore will reset all the settings and apps and thereby fix all the problems that may be bugging you. You can always backup your data from the iCloud once you are sure that the issue got resolved.
If your iPhone suffers the nagging issue, you can try these methods in that order. We are sure that any one of them should resolve your problems without the need to reset your device.