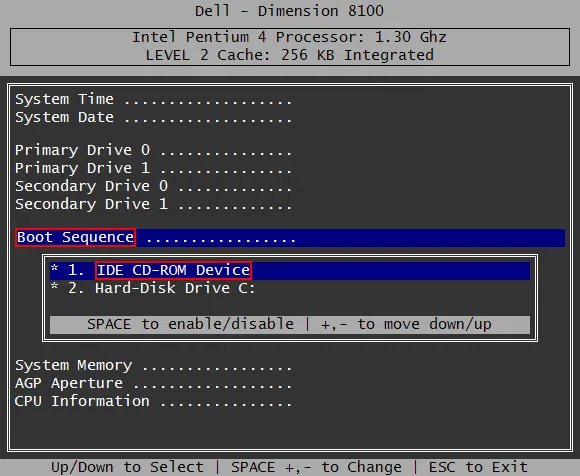
The Basic Input Output System or BIOS in your system is assigned to control the entire basic functions take place in your system. From date and time settings to configurations like boot priority and memory and processor speed, BIOS controls it all. It also controls whether specific elements are enabled or disabled, such as on-board audio processor and USB ports. You have to access the BIOS when it comes to change boot priority. You may have to format your system by booting from a USB drive or Windows CD, or you may have installed a new hard drive. This way, it is important to change the list to define the order the system may boot from specific devices.
BIOS settings program is also available on your DELL computer which controls all your hardware configurations. These configuration settings are stored in Complementary Metal Oxide Semiconductor (CMOS) battery chip. This chip maintains settings when your DELL PC or Laptop is turned off.
On your Dell computer, the BIOS can control all the hardware features. It keeps track on system speeds and temperatures, enables/disables hardware components, and defines sequence to boot the PC from any bootable device. We have listed the detailed steps on how to access BIOS settings on Dell desktop computer and laptop.
Steps: How to Access BIOS on Different Models of Dell Computer
Part 1. For Dell Latitude Dimension, Inspiron, Precision, and Optiplex Models
Step 1. Turn your Dell computer on. If it is running already, restart it. All you need to get to the initial display screen to access the BIOS.
Step 2. When the BIOS manufacturer details are displayed on the initial screen, press 'F2' key quickly. In Dimension and Optiplex models, the BIOS settings can be accessed from 'Del' key, rather than 'F2'.
Step 3. The next screen will appear is BIOS settings. Enter password ( click to reset BIOS password if forgot), if it asks. Once finished in BIOS section, save the changes. Restart the system for changes to take effect.
Part 2. Enter BIOS in Dell 4400 Model
Step 1. Power on or restart your Dell PC.
Step 2. On the initial screen when it displays Dell logo, quickly press 'F12' button before it disappears. Keep pressing it until it displays the message 'Entering Setup'.
Step 3. Enter the password, if it asks. Wait for a few seconds until its loads BIOS screen to navigate it.
Part 3. Accessing BIOS in Dell 400 Model
Step 1. Turn your Dell 400 PC on. If it is on already, you need to restart the system. To access BIOS, you have to reach the initial display screen.
Step 2. When the initial screen appears and displays the details of BIOS provider, you need to press 'F1' or 'F3' button.
Step 3. If it asks for password, provide it. When BIOS settings are changed, be sure to save changes.
Part 4. Accessing BIOS in older Dell Models
Step 1. Reboot or turn the Dell PC on.
Step 2. On the initial boot screen when Dell logo is seen, press 'Del' key or 'Ctrl + Alt + Enter' key combo.
Step 3. Wait for few seconds until BIOS loads the screen and navigates it. Enter password if it is set already.
Caution: Improper changes on BIOS settings may lead you to trouble when operating system no longer starts on your system. This way, it would be better to record BIOS settings before any modifications.
Conclusion
So, you have got a new Dell system but encountered a sudden problem in your Windows? you might to need reset your Windows login password and need to boot from USB drive. You may want to format your existing Windows to get back to its previous state. This way, you have to enter Dell BIOS settings to change boot priority.
Different computers have different procedures to access BIOS. In general, you may have to press F2, Del, F12, F1, or F3 buttons, depending upon the hardware configuration. To know exactly how to get it done, be sure to consider the above points.