Linux is a genuine free operating system, just like Windows (XP, 7, 8, 10) and Mac OS. It's also a famous open source operating system that anyone can freely control how the software runs. With the same configuration, Linux software requires less memory when running than Windows and it only uses root directory to save files, no disk like Windows. You know the larger the number of fragments, the slower the file read rate, that's the reason why Linux runs faster than Windows! There is no denying that, Linux is a far better choice than Windows in the area of security, availability and ease of use, so, more and more people are trending to install Linux systems on their computers, but the installation of Linux systems is more complicated and error-prone, so many users are blocked from the door.
To make a Linux booable USB disk, you need to first burn Linux ISO image to USB drive, however, burning is not the same as copying. If you directly copy the Linux ISO file to USB drive, you will found it doesn't boot properly. This article will introduce how to burn Linux to USB under Windows system with best Linux ISO burner software.
Method 1: Burn Linux to USB using WinSetUpFromUSB
WinSetupFromUSB is a bootable USB creation tool which let you install an Linux or Windows operating system from a USB disk. It allows users to create a bootable USB for all system including many Windows, Linux, DOS, and other utilities. Since version 1.1 programs can create USB disks that support EFI for Windows version. Like dr.boot, this program also provides user with neat and clean graphical interface so that users can select the correct options without causing confusion.
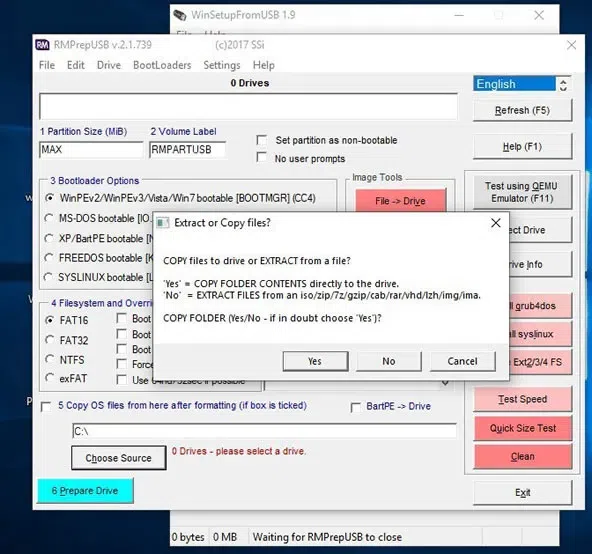
1.) Support multiple windows 7/8/10 / server 2008/2012 / xp / 2000/2003.
2.) Support starting bartpe / winbulder / ubcd4win / winflpc from different partitions.
3.) Support Linux distributions launched from syslinux.
4.) Set the grub4dos as the main boot loader.
Method 2: Burn Linux to USB with Dr.Boot on Windows 10
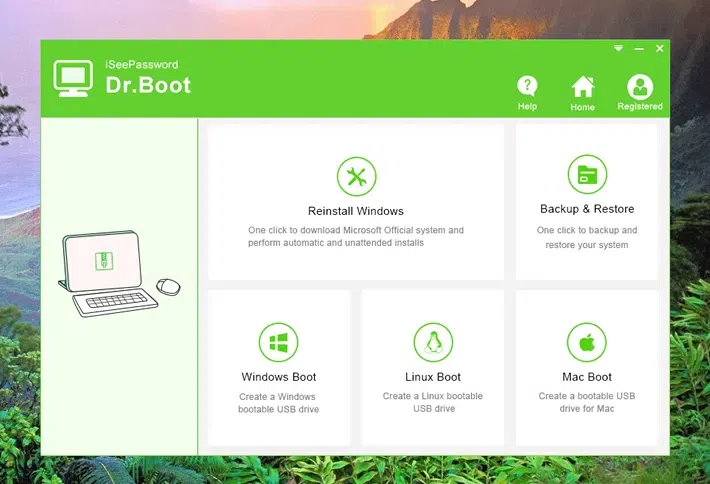
If you're not comfortable with complex command prompt, then Dr.Boot would be your best choice. It is a powerful Linux ISO burner software which provides users with five major functions for managing and creating your bootable disk, including reinstalling system, system backup and restore, Windows USB bootable, Linux USB bootable and Mac USB bootable. Each feature is tailored to specific user needs. It is a simple and easy to use software that allows you to burn any Linux image file to USB drive and make it bootable. The whole burning process is very simple and quick. It's better than UltraISO because sometimes it won't be boot from the USB drive that crated by UltraISO. Dr.boot
The interface is comfortable and simple without unnecessary interference and ads, and smoothly works on Windows 10/8/7 / XP. The procedure is simple: First, select the Linux ISO file, and select the target USB drive, then click the 'Burn' button to burn Linux ISO to USB drive. Wait a couple of minutes and you will get a Linux bootable USB.
1Download and Install Dr.Boot on Windows Computer
First, to burn Linux to USB drive, you need to first download and install Dr.boot on another Windows computer. After installation, launch it! Then select the Linux Boot option and next.
2Import Your Linux ISO File and Plug in Your USB Drive
Click “Browse” button to import your Linux ISO file to program and plug-in your USB drive, the program will identify your USB drive automatically. Then click Burn button to start to write Linux ISO to USB.

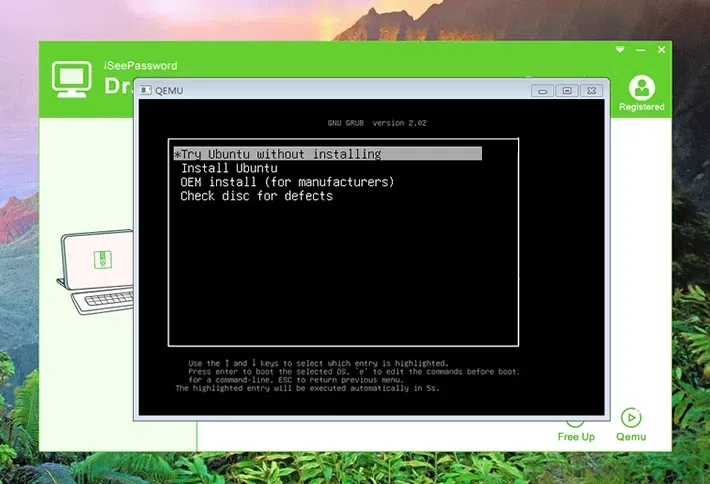
3Step 3. Start Simulation from the Program
You can click the Qemu button to start Linux system in the emulator, but it will suspend when it reaches the installation interface. It means the the Linux ISO is burned to USB successfully! And your linux USB is bootable!
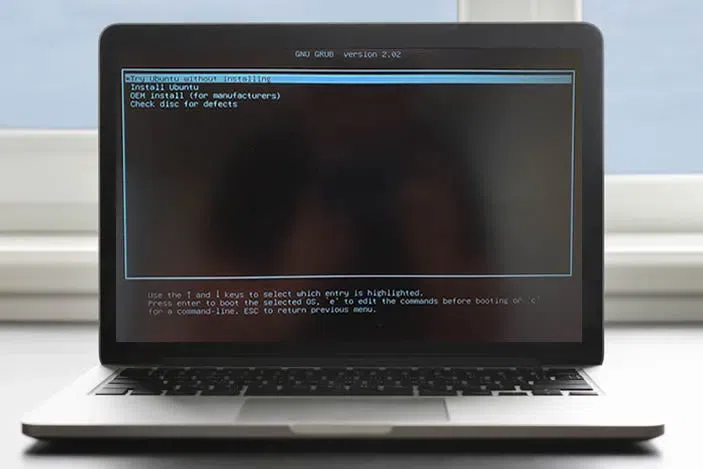
4Boot Your Computer from USB and Start to Install Linux
Now, to install your Linux on your computer, you need to first set your computer boot from USB drive in the BIOS. Then setup will start.
Dr.Book can be able to perfectly support UEFI-based computers, it solved the problem that UEFI-based computers cannot install Windows 10 system. At the same time, it supports simulation boot without restarting the computer. Simulation startup can help you check whether the burning is successful.
Method 3: Burn Linux to USB using dd Command Prompt
If you don't want to use Dr.boot to burn Linux to USB, there is also another complicated way to burn Linux to USB. That is the dd tool in Linux, we can make a bootable ISO for any Linux operating system. The dd tool is pre-installed on most Linux distributions. If you need to use dd in Windows platform, you need to first download and install dd from the Internet. dd is a very useful Linux command for copying a file with a specified size block and perform the file conversion when copying. The d command makes it much eraser to make a bootable USB. Just: sudo. dd if = xxx.iso of = / dev / sdb bs = 1M.
Step 1. First, you need to format and uninstall your USB drive. On your Linux computer, we suppose that you've installed dd tool, then open it and type the follow command to uninstall your USB.
Uninstall / dev / sdb*
Note: sdb is your USB name which is generated and assigned automatically by Linux operating system. You can also identify it by typing
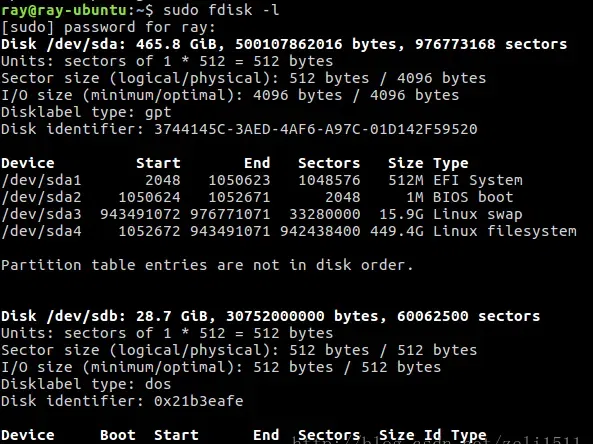
sudo fdisk –l
Step 2. To format a U disk, you need first to umount the USB disk!
sudo umount /dev/sdb*
![]()
Step 3. Then type the following command to format your USB drive.
sudo mkfs.vfat /dev/sdb -I
Step 4. Now, let's start to burn Linux to USB using the command below. The “if” value is the iso file path and the “of” value is the output device
sudo dd if=~/Downloads/ubuntu-16.04-desktop-amd64.iso of=/dev/sdb status=progress
![]()
If you want to see the current burning progress, you can perform.
sudo watch -n 5 killall -USR1 dd
Press the Enter key to execute the command you typed the steps above. Then dd starts to burn Linux ISO image to USB (sdb).There is no feedback in the terminal command windows! but you can see the read and write operations of USB disk through the U disk indicator light. The while process may take 5 or 6 minutes to complete.
Whether you wan to make a Linux bootable disk or a windows bootable disk, you must to burn ISO to USB instead of simply copying it. We have written many articles about how to create bootable USB disks on Windows and Mac. If you are not a computer expert, then you’d better use iSeePassword Dr.boot to burn Linux to USB drive, it works fast without error.

Related Articles & Tips
-
How to Create Linux Bootable USB on Windows/ Mac
-
How to Burn Kali Linux ISO to USB
-
Best Linux Bootable USB Creator
-
How to Create Centos Bootable USB from Windows/Mac