If you are a daily user of Excel files, then you must know the varieties of application and features Microsoft Excel serve. Yes, it is one of the widely used spreadsheet program of Microsoft Suite. It is equipped with so much facilities and user-friendly features that it has literally replaced the standard worksheet program Lotus 1-2-3. It is basically used for organizing data, phone numbers, call list details, customer details, address list, salary receipts of employees, etc.
Now if so much data is stored in your computer without any password protection, it is most likely to be misused by intruders, strangers, and hackers. Thus you must password protect your Excel files in order to safeguard your data. The article here would explain you the few of those methods which would help you to password protect your excel files in few simpler steps.
Method #1: Password Protect Excel Files using Save As Option
This is one of the convenient and quickest methods of all to password protect your Excel files. We all have used Save As option while saving the documents, but has never noticed the exceptional feature it possesses to encrypt passwords to your file.
Step 1. Open a workbook in your Microsoft Excel software which you want to password protect here.
Step 2. Now go to the “File” tab and click on it.
Step 3. From the drop-down menu, select “Save As” option to initiate the process of password encryption.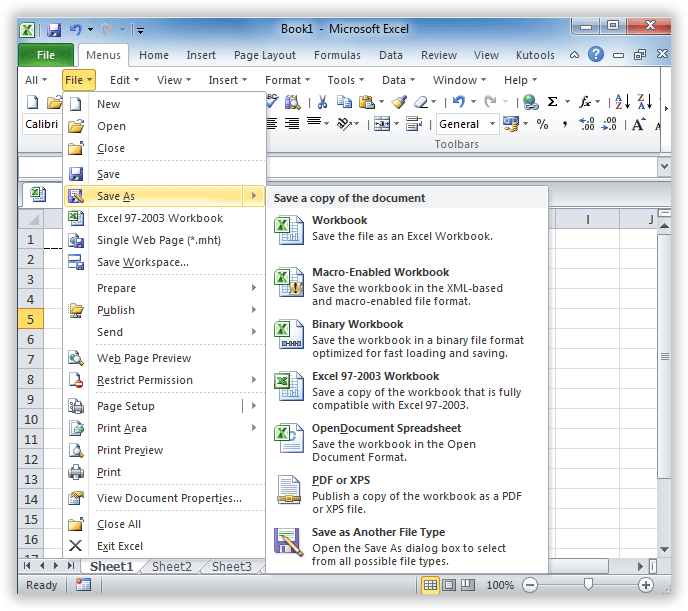
Step 4. Click “Browse” from the next context menu to select the exact Excel file for the password protection.
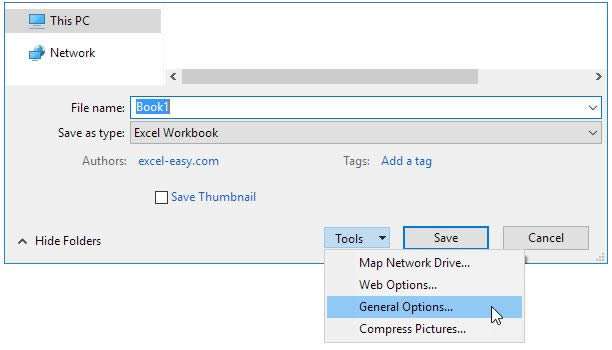
Step 5. Now beneath the “Save” button, click on “Tools” option.
Step 6. From the sub-menu that turns up, select the “General Options” option.
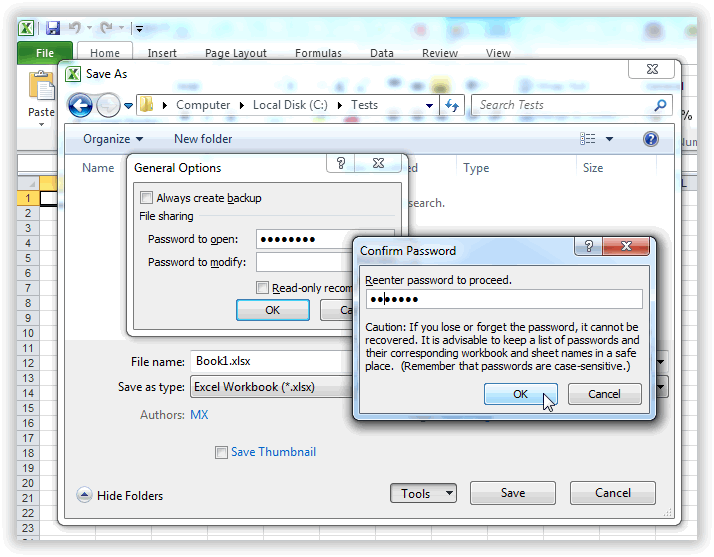
Step 7. A new window will appear in which you have to enter your password in an empty box and click “Ok”.
Step 8. Re-enter the password for confirmation and click “Ok” again.
Step 9. Now; enter a file name and save the file with the password encryption.
And there you go! So now if you open the excel file, you will be prompted to enter the password which you had set just earlier to get access to the protected file.
Method #2: Password Protect Your Excel File with Protect Workbook Feature
In this section of method, we would employ the use of Protect Workbook Feature to encrypt the excel file. It is equally applicable and reliable like the previous method to password protect your excel file but you need to have basic knowledge of using Microsoft Excel software or else you might find it a bit difficult to follow up the procedure. The guideline for the method is elaborated in few simpler steps:
Step 1. Click on “File” button from the top of the screen.
Step 2 Select “Info” from the sub-menu and then click on “Protect Workbook” option.
Step 3. From the drop-down menu of “Protect Workbook”, choose “Encrypt with Password” option.
Step 4. A new window will turn up with a blank dialog box for password entry. Enter your password and then click “Ok” to proceed.
Step 5. Re-enter your password to confirm the password and click “Ok”.
And it’s all done! Now if you open the protected excel file, you will be asked to enter the password which you had just created. In case you forget the password then there is no way out to find out the forgotten password.
Conclusion:
Excel files are very important to store a huge amount of data, and in fact in today’s generation most of the data lists and official information are exchanged as Excel Files or with .xlsx extension. And with the advancement of this incredible spreadsheet program, risks and theft possibilities have equally attained their pinnacle to cause your trouble. Thus besides using the excel files on a daily basis, you must keep a track of whether they are password protected or not. In case the files are not encrypt with passwords, use the methods explained above to immediately password protect the excel files.